Our blog has covered essential gear for remote survival, survival, firemaking, safe drinking water, and even a bit of medical. It’s now time to dive in a LOT deeper. Unequivocally, the emergency medical kit is one of the most important posts I’ll ever write.
We all carry a first aid kit in our pack when heading into the woods, right? Every gear load-out video on YouTube has one, even from the guys who dole out the wrong information. It’s that little kit most people toss in their pack or car. It’s on the list as a basic kit ANYWHERE you look. But do you know what’s in yours? Do you replenish the medical supplies you use? Do you replace expired components?
This post is NOT about standard first aid kits. Band-aids, antiseptic wipes and blister pads are covered elsewhere. This is about trauma supplies for serious emergencies – chainsaw accidents, severe bleeding, penetrating chest wounds – when you’re far away from help and minutes matter. If that’s what you’re looking for, keep reading. If you need a basic camping first aid kit, start here instead.
Editorial Note
The medical information in this post was reviewed for accuracy by a licensed physician. This guide does not replace professional medical training – it is designed to help outdoor enthusiasts buy time until professional help arrives.
Disclosure: Posts may contain affiliate links. Purchases made through our links result in a small commission to us at no charge to you. We only recommend products that meet our brand standards based on hands-on impressions, testing, or thorough research using official product information, depending on the piece.
First Aid Kits vs Trauma or Emergency Medical Kits
While I’m drilling you on your stocked first aid kit, this post isn’t even about that. Basic first aid kits, as we know, are fantastic for wound care and minor injuries like scrapes, blisters, etc. We don’t even need to talk about technique.
If you don’t know how to apply a Band-Aid, stop reading my post and NEVER head into the woods! The store-bought first aid kits are pretty self-explanatory and often include instructions.
Today, you will learn about some army ranger or EMT gear and how and when to use these survival emergency solutions. In other words, we are dealing with trauma or major injuries, and for that, we need a well stocked trauma aid kit or emergency medical kit.
If I am being honest, it’s a subject that scares the crap out of me and most other people, for that matter. The good news is the sooner you learn it and get it out of the way, the sooner you can save yourself or a loved one.
What if I Know Nothing About Medical Emergencies?
Relax, I’m not a doctor either! To become one, you need a bachelor’s degree, preferably in science to qualify for admission to medical school. Top this off with another four years of pure medical training!
A 15-minute read cannot convert you into a medical professional. But, what we can do is arm you with some essential trauma supplies and knowledge to take that cute and cuddly medical first aid kit and beef it up for serious trauma injuries. Why? For no other reason than to buy you enough time to get to first responders when faced with life-threatening injuries!
Want to Learn Proper Technique
The Stop the Bleed campaign – backed by the American College of Surgeons – offers free training resources. S&J Hardware also runs local courses in Bellville, Ontario. Gear is only as good as its user.
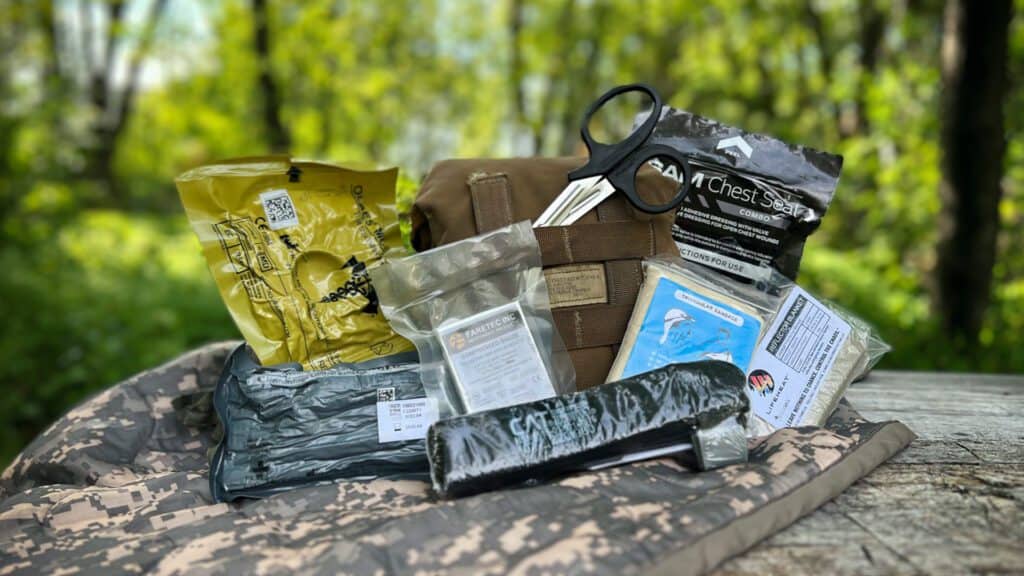
Emergency Supplies for Major Injuries and Trauma
A hot topic lately is guns. In context to the blog, here’s a simple reminder that, in the right hands, guns are just a tool! As is a knife, axe, chainsaw, and so on. These are all items we commonly and safely use in the bush. But they do carry inherent dangers.
While guns can be scary to some who have no exposure to them, they quickly forget about the dangers of everyday household items like the chainsaw – and they are far deadlier than people think.
Chainsaw accidents are horrific, and I’ve even seen a semi-major one on someone. They usually take out limbs, and for those who don’t know, areas like your legs have major arteries. By the time 9/11 gets your address and dispatches an ambulance, you’ll have already bled to death. This emergency medical trauma kit will prevent that.
I shouldn’t have to mention vehicles. Force = mass x acceleration. A 2.5-ton car doing 120 km an hour contains a LOT of energy. We’ve all seen car crashes, and without going into details of vehicular accidents, the emergency trauma bag will provide aid in this area as well.
Infinite Applications of the Trauma Kit
No matter the adventure, these additions to your medical kits apply to every activity. We’ve covered scary things like guns, chainsaws and the inevitable car accident.
What opened my eyes was an incident where an ATV troop was passing through the trails. A side-by-side member of the group drove over a thick branch that was lying on the trail. Standard practice is to drive over it, but this one bounced up and came right through the firewall. It then went right into the passenger seat like a spear! If someone had been sitting there, they would be in big trouble, if not dead. I immediately checked my side-by-side, which I bought for the safety of my family, only to find the firewall was thin plastic.
It’s time to get into the vital items of this emergency medical kit without describing all the different ways we can get seriously injured. The point here is not to create fear nor deter us from activities we love.
Since danger lurks in almost everything we do, let’s take a lesson from how a bank makes a financial decision: Risk will never be eradicated, but it can be managed. What that means here is simple: be careful, get some trauma supplies and learn basic medical care!
FURTHER READING:
Strengthen Your Trauma Kit Today! Conquer bites, water-bourne illnesses, allergies, and more with the JaseGo Travel Medication Kit.
Item 1: CAT Tourniquet for Trauma Kits

The CAT or “Combat Application Tourniquet” is the cornerstone of any emergency medical kit. Its purpose is to stop the severe bleeding of an extremity (leg or arm). Use the CAT Tourniquet when the bleed is so bad you have no time to waste. When assembling your trauma aid kit, make sure the tourniquet is easily accessibl. You will find my tourniquet outside my pack.
How To Apply a Tourniquet?
Tourniquet application is a simple process. Strap the tourniquet high around your arm or leg, then tighten the wand until the bleeding stops. It has a means to lock in place and DOES NOT need to be held once it’s secure. That means if someone were to pass out while someone else was rushing them to a hospital, the wound would be protected by pressure!
You can deploy it onto yourself and apply enough pressure to stop the bleeding, which is all by design. Once used, mark the time of application on the tourniquet with a sharpie. When in the hands of medical assistance, they will need this information.
When to Use a Tourniquet?
The best way to answer this is: You’ll know when it’s time to use a tourniquet! The bleeding will be so severe that there’s a risk of bleeding out. Remember, the average human has about 5 litres of blood, and it’s not too difficult to tell when major bleeding is happening all too fast.
IMPORTANT! Whatever you do, DO NOT remove a tourniquet, even if the bleeding stops!!!
As blood pools, blood clots and nasties can form, opening the tourniquet may release it back into the body. If it was applied in the first place, it was for good reason, and you certainly don’t want to risk losing any more blood. Yes, there is a risk of losing a limb, but tourniquets are deployed when the situation is more about losing a life than a limb.
Where Can I Buy a CAT Tourniquet?
S&J Hardware in Belleville, Ontario, put together an affordable, well-thought-out Budget Bug Out Bag, which we reviewed. We teamed up with them again for this post, and they supplied all the medical supplies for this emergency treatment article.
Years ago, I learned about tourniquets while watching ex-special forces guys on YouTube. They are all into bushcraft now, mainly as instructors. But EVERY last one of them still carries a tourniquet to this day! In other words, it is a permanent part of their basic or “standard” medical kit.
The problem is trying to find a high-quality tourniquet. Most stores do not sell advanced medical items. It took me years to walk into a store and find a tourniquet, which happened to be S&J Hardware.
In the past, I’ve talked about military items. They work, and the quality is guaranteed. The genuine military-issue CAT Tourniquet is the best in the world, and while knocked off by many, it’s never suitably replicated. The CAT Tourniquet at S&J Hardware has an NSN number (a.k.a. Nato Stock Number). It’s not “military spec” as you’ll commonly see on so many items – it is the real deal, genuine military issue!!
Tourniquet Cost and Availability
A high-quality tourniquet is generally not cheap. But all we have to do is adjust our perception and put costs into perspective. I have no fear of getting shot, as it’s unlikely in Canada! What I do worry about is the uncommon and unlikely case of my gun blowing up while I’m shooting.
The CAT tourniquet costs less than a box of bullets and a fraction of the $1,000 it costs to buy a nice, shiny new rifle. So spend a little extra and get yourself a tourniquet so you’ll be around to enjoy that new gun.
Like many people, I also chainsaw regularly. A big can of gas will set me back the cost of a tourniquet. The point is that the tourniquet is cheap insurance to protect my life from some freak accident. I hope insuring your life with a tourniquet is worth more than a can of gas!

NSN Number 6515-01-521-7976
Use promo code 'Bushlife10' at checkout to save 10%
Note
While you can piece together a trauma kit over time, the tourniquet is the best place to start if you are on a budget. It’s also available, which is a big deal considering the active war in Ukraine. Couple that with all the other wars brewing and the fact that governments are “readying” more and more troops, a tourniquet may soon be non-existent in the civilian market.
Item 2: 4″ Modular Bandage

Unlike a tourniquet, which is extreme, we also need to deal with more moderate bleeds. As commonly known, pressure is your friend in terms of bleeding control. A wrap-able bandage like the OLAES 4″ Modular Bandage will provide plenty of pressure, which you can control by how tightly you wind the wrap. The idea here is NOT to over-tighten, as we don’t want to lose a limb.
Cavity wounds also need to be packed. Some fancier products are in powder form and work amazingly well in packing and clotting. S&J Hardware even carries some of these products, but we are now talking about $60.
For the context of this post, we are putting together a well-stocked emergency first aid kit for a situation we hope we never need to encounter. We can achieve the job of packing wounds with simple, old-school gauze. The OLAES 4″ Modular Bandage contains the wrap and gauze in an all-in-one package for less than $20. Once again, it has an NSN number, and we are dealing with a military wound care supply item.
Applying a Modular Bandage
Here’s where the wrap shines. When applying the OLAES bandage, the pressure bar is placed over the top of the wound. This bar helps apply pressure directly to the wound. It also clearly indicates the location of the wound, which aids when handing someone off to another medical provider.
Velcro strips throughout the modular bandage are what hold it in position. These strips dramatically aid in proper wrapping as everything is always held in place as you go. On both ends of the wrap are two plastic clips for final security in maintaining the wrap in place.
Prometheus Medical has a short video that shows what’s described above:

NSN Number 6510-01-631-7893
Use promo code 'Bushlife10' at checkout to save 10%
Item 3: 6″ Israeli Bandage

Similar to the OLAES, the Israeli Bandage (a.k.a. The Emergency Bandage) is another vital item to have in your trauma first aid kit. The same general idea applies in wrapping to stop bleeding. Once again, this is a military-grade, Israeli-made bandage that is supplied to the US Military and most of the global elite militaries.
The Israeli Bandage has a 6″ x 9″ non-adherent pad. The non-adherent aspect of the pad reduces pain when removing the dressing! The sterile packaging can act as an improvised chest seal, and if you just had a huh moment, don’t worry – we’ll cover chest seals further below.
This Israeli bandage can apply 30-40+ lbs of pressure to the wound and act as an improvised tourniquet. Most importantly, it’s designed to be self-explanatory and easy to use, even for non-medical people.
Note
The manufacturer pulled stats that show the average first responder time in the US is 8 minutes. Most people will bleed to death within 6. The number one priority of any emergency medical is to STOP THE BLEEDING.
How to Apply an Israeli Bandage
To demonstrate the simplicity of this Isreali emergency item, I’ll quote the package:
- Place a pad on the wound & wrap the elastic dressing around the limb or body part.
- Insert elastic bandage into pressure applicator.
- Tighten the elastic bandage and…
- … pull back, forcing pressure down onto the pad.
- Wrap the elastic bandage tightly over the pressure applicator. Wrap over all edges of the pad.
- Secure the hooking ends of the closure bar into the elastic bandage.
- To remove the emergency bandage, free hooking ends from the elastic bandage.
The Israeli bandages have a loop on top of the pressure bar. In steps 2, 3, and 4, they instruct you to use the pressure applicator. Generally, you weave the wrap into the loop and then back in the direction it came from.
What’s missing here are the photos that are also part of the instructions on the back of the packaging! While this is not something you want to learn when using the product, it’s reassuring the instructions are all there for when you need it. When an average non-medical Joe is dealing with saving a loved one in shock, quite often, they are in shock themselves.
Some things are just so much easier to explain on video. Below, straight from the manufacturer, is a minute-long video on how to apply the bandage.
Item 4: SAM Chest Seal

What is a chest seal? Chest seals are designed to address open wounds to the chest (penetrating chest wounds). By chest, we mean from the neck to the navel, which includes the front, back and sides. While there are a million things that can cause this problem, a great example of a chest wound is a gunshot wound or knife stabbing.
The chest seal by no means is there to address internal bleeding. What it does do is prevent air from entering into the chest cavity, which can cause a life-threatening condition known as pneumothorax.
Coming from someone who has had a lung collapse or spontaneous pneumothorax, I can tell you that it’s one of the most painful things a person can go through. Couple that with whatever caused the trauma in the first place, and I can only imagine the pain. I had a lung collapse on my left lung, which rendered it useless. But if someone were to have it happen to both lungs, well, let’s just not go there.
What I learned years ago from my own experience is that the lung “sits” in a vacuum. The moment you introduce air, the lung collapses, making it very difficult to take air in as you breathe, which why the chest seal should be added to your tactical medical kit for more comprehensive wound care.
Vented vs Non-Vented Chest Seal
Venting seems pretty self-explanatory. A vented chest seal has a vent. But what does that mean exactly?
If there is an open wound to the chest and if in doubt, put a chest seal on. A telltale sign that a chest seal is required is if the blood around the wound is bubbling. The vent of a vented chest seal is one-way, which means it vents air OUT of the chest and does not let it back in. In other words, if applying the chest seal to a cavity with air in it, the vent is there to allow the air to escape.
Applying a Chest Seal
Chest seal application is VERY straightforward. Let me repeat the manufacturer’s instructions right here:
- Clean area around the wound.
- Grip the tab and remove the clear liner.
- Place dressing, adhesive side down, centred over wound.
- Press dressing firmly to ensure adhesion.
It’s a bit trickier than applying a Band-Aid, but not by much. It’s a lot gorier, but it is what it is. Again, the emergency medical kit gives us the tools to become the “first responder.” Our job is to delay a life-threatening situation and transport someone to a hospital. If properly done, we can also minimize any further complications from the injury – in this case, a lung collapse.
Reliable Quality of the SAM Chest Seal
The chest seal is also a USA-made military product. A key feature to look at is the adhesive. The SAM Chest Seal is designed to work in extreme heat or cold and stick through sweat, blood, hair, etc. It also has a large dome valve that works regardless of the applied pressure. It’s job is to minimize obstruction from blood clots and soft tissue.
I haven’t taken the time to put all the specs for these products here. That’s not the point of the post, as you can find this info on S&J Hardware’s website through the links to each product. I intend to show you what to carry, why, when and how to use it and where you can buy it. Looking up specs is something I encourage you to do if any of these products are of interest to you – but I will tell you, nothing here is of mediocre quality. These items are the best of the best military-issue products.

SAM Chest Seal (2 pack)
Use promo code 'Bushlife10' at checkout to save 10%
Item 5: Compressed Gauze for Wound Dressing

When the good old Band-Aid isn’t big enough – cover minor wounds with gauze and tape.
Compressed gauze is vital for major wounds and should have a home in your trauma kit. It can be used for packing wounds/cavities to stop hemorrhaging, covering larger areas, or in use with other bandages like the OLAES or the Israeli bandage.
Faratec Inc. makes vacuum-packed compressed gauze in a tiny 2″ x 3″ (half-inch thick) package. With the gauze un-compressed, there is 4.5″ x 4.1 yards worth! This gauze is a high-quality 6-ply cotton material, guaranteed sterile as long as the package is sealed. With tear-away points on the package, you can quickly deploy the gauze and cover a large wound quickly. In other words, it’s a mighty little package which takes very little space in your emergency trauma bag that’s worth every penny.

Faratec Inc. Compressed Gauze
NSN Number 6510-01-503-2117
Use promo code "Bushlife10" at checkout to save 10%
Item 6: Triangular Bandage

Wow, we finally reached a non-military issue medical item. Considering the trauma dressing is Israeli-made, it probably is mil-spec. The triangular bandage is a natural woven cotton gauze material that comes in a small 3″ x 4″ package.
You’ve already learned that bandaging has it’s obvious place in a comprehensive first aid kit. The triangular bandage is multi-functional that double as a makeshift sling or assist in immobilizing fractures.
Item 7: Trauma Shears

When someone is already in a traumatic state or pain, you may not want to move them to access wounds. Sometimes, moving them may encourage further bleeding – this is where the trauma shears come in. With its blunt tip, these shears safely and quickly cut through any clothing in the way of assessing a wound.
Trauma shears are also excellent at cutting hard materials like seat belts, heavy fabrics and even particular wires.
Leatherman makes a wicked pair of high-end trauma shears. While an excellent choice for professionals or gear junkies, at well over $100, it’s a bit steep for the average Joe. God only knows I’ve stared at the Raptor Rescue’s myself many times but ended up buying something else I needed more.
At under $10, the EMT Trauma Shears featured in this post do the same job. Since they are affordable, it’s wise to discard them after use. At least, that’s what I would do if I were to help a non-family member and my shears got blood on them.
Forget the shears – if helping someone badly injured, you might even find your clothes and shoes covered in blood, which you’ll be discarding as well.

Use promo code "Bushlife10" at checkout to save 10%
Item 8: Emergency Blanket for Your Emergency Trauma Bag

This emergency blanket is pasted from my last post: Budget Bug Out Bag. I particularly really like this product, which should be part of everyone’s medical kit and survival kit!
This Lifeheat Blanket is a heavily upgraded version of the typical reflective emergency blanket that seems to be in every kit, not just medical. It hardly takes up any space or weight. The military even issues this type of blanket to their troops. It’s to maintain warmth even in the heat of the desert. Why? With enough loss of blood, these blankets help maintain core body temperature.
The typical version of these emergency blankets is cheap or flimsy, which won’t be very helpful when it tears. Many of them will not re-pack either.
The Lifeheat reflective blanket is a heavy grade: 3 plies, 2.5 mils, to be exact. It is strong enough that two people can carry out a third using it as a makeshift stretcher! Size comes in at a whopping 72″ x 48″ yet packed, it’s only 3″ x 5″ with about an inch of thickness. The weight of this item is a mere 140 grams! It makes for an outstanding piece of kit to carry that reflects up to 97% of your body heat. Get one while you can. Otherwise, keep checking back if the Life blanket is not in stock – it’s well worth your time!

Use promo code "Bushlife10" at checkout to save 10%
Item 9: Storage Options fo Your Medical Kit
Like most items, I suggest you store your emergency medical kit in a dry, cool location away from direct sunlight and somewhere easily accessible. Here are a few storage solutions that work well at keeping your medical supplies safe and secure.
Ammo Can
The ideal container for storing your medical emergency kit is an ammo can. Ammo cans are cheap as dirt, durable, water-resistant, and protect their contents well. The trauma supplies in this bleeding control kit easily fit an ammo can and can be quickly retrieved. The downside to the ammo can is weight, making it more ideal for an emergency medical kit that never leaves your home, hunt camp, car, etc.
Pistol Case
A hard pistol case also makes an excellent storage container for your emergency medical kit. Considering the case is strong enough to protect a pistol, which is worth some serious coin, you can trust your gauze in it! This route is more expensive than an ammo can, which is a lighter and more feasible option, especially if you have a spare one. ut the pistol case does make an excellent waterproof first aid kit!
IFAK Bag

My personal choice for storing this emergency medical kit is a USMC (US Marine Corps) IFAK bag. IFAK stands for Individual First Aid Kit. It used to be my fire kit bag and has been lying around empty. I was going to say how ironic it is that every item listed in the emergency medical kit fits perfectly in this bag with some room to spare. But then again, it is a medical kit bag!
The IFAK bag size filled is 7″ x 9″ with a 4″ depth, not bad at all! It has Molle straps, which can be attached to almost anything. The bag’s weight with contents is also minimal, which is lighter than a typical water bottle with water in it.Everything is just a hairline snug, which is fine by me. Keeping things snug means security and provides a basic level of organization.
You’ll need to scour some surplus stores to find this gem – but surplus stores seem to be few and far between these days. A quick Google search, and you might get lucky as more and more surplus items are moving online. The cost was around $20, which is nothing, as the IFAK bag will last forever.
Next Steps: Training and Education

The entire point of the Emergency Medical Kit post is to buy time when bad things happen. Buying time means slowing down life threats, mainly bleeding. A well-stocked emergency trauma bag should help you buy enough time to get to a real doctor.
While the items in the medical kit are not that difficult to learn, it’s also not the type of thing to figure out when minutes or even seconds count. We also have a recurring theme on the blog that gear is only as good as its user!
Stop The Bleed, Medical Trauma Course
S&J Hardware teaches a course called Stop the Bleed. It typically runs from 9 AM to about noon and basic medical treatments like wound packing, tourniquet use, dealing with gunshot wounds, and severe trauma. A few hour-long course at $54.99 is money well spent to learn assessment, treating serious injuried and hemorrhage control!
As a bonus for taking the course, there is a 10% discount on any medical products paid for at the course. If this sounds like it’s for you, search for “Stop the Bleed” on S&J Hardware’s website. Contact the store if you do not see any courses listed.
St. John’s Ambulance First Aid Training
Understandably, not everyone can get to Belleville, Ontario to participate in first aid training, which is why St. John’s Ambulance is a fantastic alternative. With various course options, they offer training from emergency first aid and CPR to mental health and even WHMIS.
Again, we are not trying to become doctors, and you do not need to go overboard with this. The goal is to enhance your skills to use the supplies in your emergency medical kit to provide basic medical treatments. Which hopefully is never.
Medical Emergency Kit Conclusion
I recently lost my grandmother. She was a wonderful woman who raised me, for which I am forever grateful to her. It’salso why it’s been so quiet at BushLife, and my apologies to our readers for the delay in posts.
Grandma passed away from natural causes, age to be exact. But it was so sudden and without warning that it came with great shock. She is my inspiration for this post, as it’s bad enough to lose a loved one – it’s a lot worse when we are robbed of them before their time is up.
So, whether it’s a backpacking first aid kit or a home medical kit for emergency preparedness, spend a few bucks on quality trauma supplies, learn a bit of medicine and be prepared to handle unexpected medical emergencies! Your adventures into the woods and daily city life will improve with confidence and reduced worry, knowing you can care for yourself and those you love most.
More BushLife Emergency Preparedness:
- CAT Tourniquet Full Review: deep dive on the most important item
- Jase Medical Kit Review: antibiotics for when you’re far from help
- Budget Bug Out Bag: the starter kit that pairs with this medical kit
- Remote Area Survival Pack: the full professional setup
👉 Thank you for reading my guide on building your emergency medical kit. I hope you found it helpful in understanding the essential trauma suplies needed for survival situations. Please consider sharing this information with those interested in emergency preparedness.
Bookmark this post on Pinterest for future reference!


 18")