It doesn’t matter how you got here. Maybe you pushed your ATV one trail too far and now it won’t start. Maybe your truck died on a logging road with no cell service and the sun is dropping. Maybe your hunt camp is three clicks from the nearest road and something went sideways. Maybe you pitched your tent thinking it would be a simple overnight and now the weather has other ideas.
The situation is the same. You’re remote. Help isn’t come straight away. And what’s in your pack right now is all you’ve got. Now what?!?
Disclosure: Posts may contain affiliate links. Purchases made through our links result in a small commission to us at no charge to you. We only recommend products that meet our brand standards based on testing and first hand use by our authors.
What Did For Me
I’ll never forget the day I learned this lesson the hard way.
September 2019. Brand new Side-by-Side. Packed up the family and hit the trails hard with VERY little gear, eager to play with the new toy. At least 15 kilometres into the bush, a tree came down and blocked the trail to our only way out. Staring down a wet, muddy trail, a setting sun and the cold chill of fall rolling in, I admit I was more than a little scared. Add a wife and two little kids staring at me, and it turns to desperation. By some miracle, a troop of ATVers came through, and they were more prepared than I was. They removed the fallen tree with the chainsaw they had on hand. Luck is not a survival strategy – lesson learnt!
Since that day, a proper survival backpack goes everywhere I go in the bush. It has gotten me through multiple situations that could have turned ugly fast. This post is everything I’ve learned – not from a manual, but from real time in the Ontario wilderness. If you’re heading into the outdoors, whether it’s your first time or your fiftieth, this is what actually needs to be in your pack.
Which Guide is Right for You?
How Far Are You Going From Help?
✔️ A few hours on a marked trail, back before dark? See our Essential Day Hike Packing: What to Bring and Why When Day Hiking – light and simple.
✔️ Remote bush, hunt camp, off-road trails, or back roads where cell service disappears? You’re. in the right place. Keep reading.
✔️ Want the essentials on a tight budget? Budget Remote Survival Pack – the non-negotiables without the price tag.
A Note on Conditions: Ontario Wilderness is No Joke!
A lot of survival gear content out there is written for desert Southwest Americans or Pacific Northwest hikers. Ontario is a different animal entirely. We are talking dense boreal forest, unpredictable weather that can swing 20 degrees in a day, black bears, and trails that can disappear under a foot of snow overnight from October onwards. Water crossings that look shallow and aren’t. Trails that look maintained and aren’t. Cell service that disappears the moment you actually need it.
This gear list is built for far from help reality – not a Hollywood survival scenario, not a weekend glamping trip. It’s what a real person carries when heading into real Canadian bush, whether that’s a day hike, an ATV trail ride, a hunt, or a fishing trip. You don’t need all of it every time. But you need to know what it is, why it matters, and how to use it before you need it. It’s a outdoor survival pack that will get you through the next 24 to 72 hours should SHTF!
What to Pack for Remote Areas?

When help is far away and things can instantly take a turn – this is the list of survival gear that I carry. Below this gear list is where I get into why you need to carry these must-have items.
- backpack
- pouches
- knife
- saw
- multi-tool or Swiss Army knives
- fire survival kit (waterproof matches, emergency candles, tinder, fire starter, Vaseline-soaked cotton ball, lighter, Ferro rod with striker, stainless steel straw)
- stainless steel nesting bottle/cup set
- water filter (water bottle, water purification tablets)
- sustenance kit (MREs, calorie food bars, snacks, energy drink powder, fillet knife, long spoon)
- extra set of clothes (+ base layer, socks, rain poncho)
- leather gloves (warmer months)
- tarp (550 paracord, #36 bank line, tent stakes)
- garbage bag
- sleeping pad, sleeping bag (if carrying a large backpack)
- emergency blankets (thermal blankets)
- navigation kit (local maps, compass, GPS or GPS watch)
- signal kit (whistle, signal mirror, bright orange cloth)
- headlamp, flashlight
- power bank, charging cables
- waterproof notepad and pen
- cotton bandana, cotton shemagh
- fishing kit (fishing lines, lures, sinkers, snare wire, hooks, spinners, safety pin, weights)
- duct tape
- aluminum foil
- toilet paper (not a roll), personal hygiene items
- piece of leather
- candle lantern
- cell phone, phone charger, emergency radio
- first aid kit (hand sanitizer, CAT tourniquet, prescription medications)
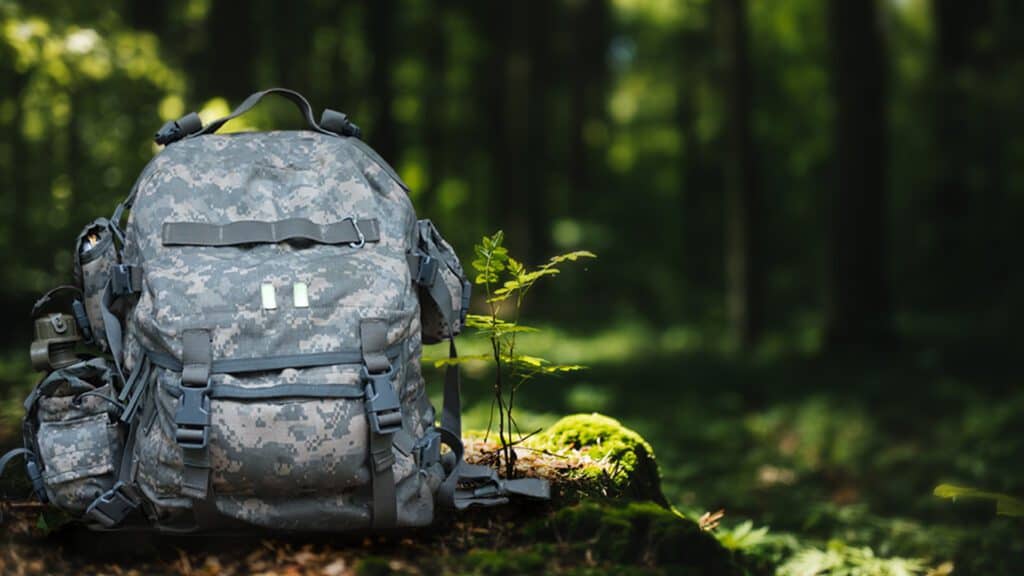
Choosing the Right Backpack for Wilderness Survival

Whether you call it a survival pack, a day pack, or a bug out bag – what goes inside it can make all the difference between a story you laugh about later and one you don’t get to tell.
For my wilderness survival backpack, I went with a tactical looking pack – it’s the best style of bag as an EDC and organizing your gear. My goto is the
The Rush is designed to withstand the rigors of the terrain and elements, which I can definitely confirm. I’ve had the Rush 24 strapped to my ATV, thrown into a SxS, in a car, and on camping trips. It has been lashed by branches, stepped on by a dog, rained and mudded on, and it still looks good, does not leak through, nor are there any holes!
The Rush 24 comes in at 37 litres, which is neither too big nor too small for most activities. It has the most amazing pockets to store gear in an organized fashion, and with tons of MOLLE webbing, it is super easy to expand the pack by bolting on just about anything to the outside.
The Rush 24 backpack is designed to hold 24 hours worth of gear, but in the right hands, it will cover a 48-72 hour long-term survival situation with careful planning. It also takes an absolute beating without showing any signs of wear. The only complaint is the weight, but I guess that is the price of durability.
If you are not into tactical bags, no worries, you have plenty of other options.
Brands like Osprey, North Face, Arcteryx, Marmot, Kelty, even YETI make for excellent hiking survival backpacks that are purpose-built for the remote wilderness. Whether its short range or long range packs, remember that nylon is more durable than polyester, and YKK zippers are a good sign of quality.
Most importantly, if not trekking through the woods, at some point you will need to carry your pack – make sure it fits you well! This means having good padding in the shoulder straps and back, not to mention well-positioned sternum and/or hip straps. Look for lightweight survival backpacks, preferably with MOLLE webbing. There are some gear that you want attached to the outside of you pack available at the ready.

5.11 Rush 24 2.0 is a backpack with ample storage, durability and comfort. It offers 29 individual compartments, Molle webbing for attachments, and adjustable yoke and straps.
Whether day hiking or bugging out for 24 hours, this high-strength 1050 denier nylon pack will keep your gear protected. It's also water-resistant and ready for your toughest adventures.
Bush Survival Gear for Beginners Starts With Cutting Tools!

Knife
If you ask any outdoorsman: if you could only have one item in the bush, what would it be? The answer is always a knife. It is such a pivotal piece of gear that you should carry a backup knife.
Why? A good knife will have a full tang, which allows you to process wood by batoning (where your knife doubles as an axe). You can use your knife to make tinder by feather sticking. And then, there is the world of bushcraft that opens the doors to making everything from tent stakes, spears, traps and utensils to an entire shelter out of wood and natural materials.
Last but not least, you can cut food, clean game and even hunt with the survival knife if you are creative enough.
Pro Tip
Carry your knife on your belt, not in your SHTF bag! If separated from your backpack, your knife is something you do not want to lose when you’re far away from help. It is also good practice to keep a backup knife in your pack.
The Morakniv Garberg Carbon is the gold standard for bushcraft and my favourite knife – see the Mora on Amazon here.
The blade is just right in length. With its carbon steel construction and 90-degree spine, it will easily throw a hot shower of sparks from a Ferro rod to get a fire going, and its Scandi grind makes for easy sharpening at home or in the woods. In addition, the Garberg is a full tang and baton-capable blade.

If you’ve ever worried about snapping a knife while batoning wood, the Garberg is the answer. It’s a full-tang beast that feels solid in the hand without being unnecessarily heavy. I’ve found the carbon steel holds a scary-sharp edge, making it just as good at slicing dinner as it is at processing kindling. It’s not flashy, but it’s the one tool I never leave out of my pack.
Saw
Remember that tree that came down? With no side-by-side or ATV, carrying a chainsaw is not feasible to hike the woods with – a lighter, smaller option is necessary, hence the Silky BigBoy 2000. And no, get your head out of the gutter.
Silky is the company, and BigBoy is named accordingly, as it is one of their larger saws. This monster has a 14″ blade, and thanks to how it folds up, it fits nicely into your bug out bag backpack!
The Silky BigBoy 2000 will process wood with ease. It saved my ass more than once when clearing fallen trees off the road. And yes, there is a recurring theme here with trees. It happens more than you know in rural areas, which is precisely why the bigger saw is preferred, unlike the typical backpack gear setups with smaller saws like the PocketBoy.
When it comes to utility, a saw is handier than an axe as it processes firewood much faster. Couple this with a full-tang Morakniv Garberg knife, which can further baton the pieces of wood, and there is no need to haul an axe. Not to mention, the Silky BigBoy only weighs 1 lb.

Tired of saws that dull out fast? Meet the BigBoy 2000. With XL teeth and a long cutting blade, this bad boy powers through wood like a champ. Folding down to 9 inches, it's super easy to stash in your backpack or glove box, keeping you prepared no matter where the trail takes you. Perfect for campers, hikers, or for basecamp construction and camp furniture creations.
Multi-Tool
A multi-tool is another basic survival gear for backpack item to carry into the woods. Encompassed in this one tool are pliers, screwdrivers, a can/bottle opener, scissors, files, and so on. Of course, it is also a cutting tool, providing you with a spare knife and saw, which is excellent for smaller tasks.
The preference here is the Leatherman Charge + TTi, a family favourite and Leatherman’s flagship model made of premium materials.

For easy access, just like your knife, you should carry this on your belt. Being so small and of such great utility, it is worth having this on your personal layer versus the pack layer. My Leatherman Charge is part of my EDC!
The sheath has a slot for extra screwdriver bits that come with the tool. The big tip here is to sneak a mid-sized Ferro rod into one of the two available side loops of the sheath.
Pro Tip
Wrap the Ferro rod with Gorilla tape. It keep it secure and prevents it from sliding through the loop.
If you get where I am going with this, you will have these survival tools – knife, multi-tool, fire-tool and thanks to the tape, some tinder, gear repair and even medical options on your person at all times. This collection of the best survival items become a little emergency kit!
Fire Making Emergency Supplies

Fire-making is a vital skill in the woods, especially when help is far away. From providing warmth, drying clothes, sterilizing water, and cooking food, it is a skill that can save your life. If you do not already know it, practice and learn it now! You can even make a fire in the snow.
Once you master different ways to start a fire, follow this simple rule: make fire the most efficient way possible. For that, you can not beat a lighter and Bic is yet another gold standard – it is also cheap as dirt. Carry one in your pocket and in your survival fire kit that should be in all your emergency kits.

What is a Survival Fire Kit?
Your backcountry emergency kit is more useful when using pouches, stuff sacks, tins, etc. Custom kits should be organized by use, such as fire, cooking, medical, etc. It makes it easy for quick and organized retrieval of gear. For example, my fire starting kit is a soft leather pouch from a local native reserve.
Fire Starting Kit Emergency Supply List

- Emergency candle(s)
- UCO waterproof matches in a sealed container
- Ferro rod with striker
- Vaseline-soaked cotton balls in a zip lock or tin: with a Ferro rod, the vaseline/cotton ball mixture lights easily and burns for a long time.
- Some dry tinder in a ziplock (birch bark, cattails, etc.)
- Stainless steel straw. It makes a worldly difference when blowing air into a fire to help it along.
The general rule of thumb is to carry at least 3 ignition sources! An absolute must for any backpack gear load out.
In the colder months, your hands are cold, leaving your gross motor function undesirable. We suggest you opt for a large Ferro rod versus its smaller counterpart. The large rod is easier to work with and may save your life. Imagine falling into an icy lake or river, coming out and then trying to spark a mini Ferro rod with frozen fingers.
The Ferro rod is the fire-making workhorse of the woods, and it NEVER fails. Practice and learn how to use a Ferro rod properly – do not leave it to chance to figure it out when survival situations occur.
FURTHER READING:
Want to master fire starting before you need it? Check out, ‘How To Use a Ferro Rod‘.
Bic Lighter Myths
The Bic lighter gets a bad wrap, but it is a myth. Let’s look at a couple of these myths.
Myth #1: The Bic Lighter does not work in the cold! Sure it does. Carry it in an inside pocket. Your body heat will keep the gas warm.
Myth #2: The Bic does not work if submerged in water. While it is true, it is not difficult to resolve. Blowing on it intensely for a minute or two will get it going again, especially if you remove the child safety tab.
What Do I Need in My Pack for Water Procurement and Treatment

The Priorities of Survival in the Outdoors
Water is vital, but we have been saying that throughout the post. So, let us address the priorities of survival.
Medical always comes first, and you need to deal with life threats before anything else. It does not matter how much water you have if you are bleeding out. Then comes fire in a cold climate to keep you warm, and let us couple that with shelter so you are warm and dry! Next is water, as you will only survive for up to three days without it.
When you’re far from help, drink contaminated water, and you are in for a different world of hurt. Water first needs filtration, and a cotton bandana draped over a container does wonders with this task. Water then needs to be sterilized, which means carrying water purification tablets or boiling.
FURTHER READING:
Need safe drinking water in the bush? How To Make Safe Drinking Water Outdoors will guide you.
What to Carry in the Bush? A Metal Container – Why?
A military surplus plastic canteen is fantastic for carrying clean water. It nests into an open-top stainless container for storage. Use the stainless container to collect water, which then gets placed into the fire for sterilization. It doubles as a pot for cooking food, and you can find these easily in surplus stores on the cheap.
The Pathfinder nesting bottle/cup set is stainless steel, thus allowing for more water volume when boiling. This set is a little more sophisticated, backpack-friendly, and somewhat expensive, but it is well worth it.
Following the pattern, a metal pot of some form is a MUST, and it has to be of single-wall construction. Ie. Not insulated and not a thermos. Insulated or double-wall containers will not allow you to boil water.
Both the military and the Pathfinder pots have fold-out handles that make putting them into an open fire safer – the handle(s) fold back for compact storage.
Pro Tip
Use the pliers from your multi-tool or very carefully use a piece of cloth whenever you are
stuck with a pot that lacks handles.
All-in-One Water Filter for Survival Backpacks
Nowadays, a good water filter will filter and sterilize in one step. Not to mention, provide an extra container to store and transport water. You will find in my portable emergency kit a Katadyn BeFree or the Grayl Geopress water filter. Both are the best options as a survival water filter.
If you are remotely serious about spending time in the great outdoors, you need a purification filter as a part of your wilderness survival backpack. The Geopress is a large and faster water filter, but the BeFree is lighter and takes up less space.
There is one caveat. The water filter in the warmer months is fantastic when water is abundant – and our hydration desires are considerable. We say desires as it is a response to thirst. You typically NEED just as much in the winter.
However, in the winter, we are more interested in melting snow. If you have not guessed it, that means back to a metal pot! Taking the filter out in winter also provides extra room for bulkier winter survival clothing like extra thick socks, gloves, etc.


What Survival Kit Food Items Should You Carry
Your survival food kit should include a three-day supply of food. You will always find an MRE or two tucked away in my get home bag. It is a emergency backpack, after all. The MRE provides a significant nutritional baseline for anything else we add to the food department. With a long shelf life, you need not worry about it expiring.
The Sustainment Pouch
Once we get into an outing, it is nice to pack an extra day’s worth of food just in case anything goes wrong. Space should not be an issue, provided you have a tactical backpack – Molle panel bundle (built-in MOLLE webbing), which allows you to bolt on a smaller food bag. For that, I use one or two 7-litre military sustainment pouches.
These are simple one-pocket pouches that attach via MOLLE straps. That also means they separate easily to facilitate hanging them in a tree for bear safety during the warmer months. All you need is some paracord.
Snacks or Short Trips
There are times when we are not looking to cook meals. Maybe it is a day hike or an outing to the hunt camp. In these cases, look for calorie-dense items. Some favourites here are a stick of salami, jerky, canned tuna, individually wrapped oatmeal cookies, nuts, homemade trail mix, and any of the million iterations of calorie food bars out there. Admittedly, I always carry a Mr. Noodles as it is a great comfort food for the outdoors. Don’t forget to add some energy drink powders.
Between snacks and quality MREs, it is easy to pull off a day or three in a justly light manner, even without refrigeration.
Food and Survival
For the record, food is NOT an immediate survival priority! The human body can go anywhere from 1 – 3 months without food! It does, however, help immensely with mental well-being, general comfort, and stamina. The big one here is thermal regulation. Being fed will help you stay warm and give you the energy to keep moving forward in those colder months.
Knowing that there is an emergency food pouch in your wilderness survival pack is peace of mind. It is a cheap insurance policy. If kids are involved in your life, I do not see this as optional.
Other Food-Related Items
There are a few other survival supplies to add, the big one being a long-handle spoon. Freeze dried meals are consumed straight out of the bag. The long handle keeps your hands clean.
We also include an Opinel fillet knife dedicated to food preparation. In a survival situation, we can procure fish and will want to preserve every ounce.
Lastly, we have a tiny salt/pepper/oregano shaker. Technically, it is a useless survival item, but if it is potentially my last supper, it better be a good one:) Well, not really, salt, in particular sea salt helps balance electrolytes, prevent muscle cramps, and it keeps you hydrated. A few grains in water will go a long way in a survival situation.
Emergency Shelter for Your Survival Pack

Your clothing is your first layer of shelter. It is astonishing how often this is left unnoticed. Dress appropriately for the weather, and for the sake of time, we will leave that to common sense for the most part.
Make sure you add an extra set of clothes, which includes socks and rain gear to your EDC survival backpack. Keep the bulk to a minimum! You can dry your clothes by the fire while you wear the other.
One item worth mentioning here is Fjallraven Keb pants (read the full Keb trouser review). It is what I wear every time I go in the bush. They happen to be bug-free and purpose-built for the outdoors. With a base layer, they will even suffice on many a cold day, just not the harsh ones that call for dedicated winter gear.
In warmer months, I will pack a light pair of leather gloves. You will be amazed at how easy it is to trash your hands when processing dry or rough wood. When you are in the bush, the last thing you want are problems with your hands or feet.
Something to Sleep Under
For emergency shelters, I like the military poncho. The rain poncho is protection from the rain while on the move, and it keeps your pack dry as well, which is vitally important.
For bunkering down or spending a night in an emergency, it doubles as a tarp. Sometimes, I will sub in an actual tarp, but to be honest, the rain poncho is the general go-to. With it goes a rapid deploy ridge line and some tent stakes, meaning we can have cover from the elements within minutes. And no, we do not need a tent to survive a night in a forest!
On this topic, let us not forget cordage. Always carry some hanks of 550 paracord in your bug out bag. It is yet another vital backpack survival gear item that has a million uses.
Now, we also need something to sleep on. To save space and weight, you can carry a large garbage bag, and you have yourself a sleeping pad. Fill the garbage bag with leaves or cedar bows, which creates a browse bed. The cold penetrates from the ground – the makeshift bed will get you off the ground and out of a bind. The trash bag weighs almost nothing and hardly takes any room in your survival pack. Sub the trash bag for a sleeping pad if you are backcountry camping or toting a large-sized backpack.
For warmer days, your bug out bag will have the trusty military poncho liner for something to sleep with. In other words, a light blanket. Unfortunately, a winter sleeping bag is bulky and does not fit. So we carry that separately when mechanized and deeper into the woods.
The Emergency Blanket
I have a love-hate relationship with these. If people relied on them for warmth, there was a good chance they would die. What can you possibly expect from a paper-thin piece of plastic? A real blanket is a blanket for a reason, and there is no way around insulation bearing a particular size and weight.
Wrap yourself tight in the emergency blanket, and you will trap some heat thanks to its reflective properties – but you will also trap a lot of moisture from your body, just like a horrible raincoat. You will find yourself cold and wet, which is deadly. There is a way to use emergency blankets properly, you will not like the outcome as it is not pretty.
The military-issued emergency blanket has been utilized in the heat of the desert. Why? With enough loss of blood, it is hard to maintain core body temperature. These blankets have their time and place.
My favourite is the Arcturus – it’s a well-crafted, quality blanket. It hardly takes space, has little weight, and is strong enough to double as a tarp or makeshift stretcher. I am not naive to think I will wrap myself in it and survive a cold winter night. Bottom line: in an emergency, you want a blanket that works – the Arcturus is a no brainer.
FURTHER READING:
Relying on an emergency blanket to save your life? Discover which blanket is better for you.
Not to be Missed – Navigation and Communication Gear

When you’re far from help, navigation isn’t about finding scenic trails – it’s about getting out, which is why my survival backpack land navigation kit consists of a map of the area and a compass. When buying a compass, you know you have a good one when it locks on north quickly and is stable.
I used to carry the Suunto A-30. Suunto makes excellent compasses, and they lock onto the north with ease. The A-30 has luminescent markings, making it easy to read in low-light conditions. It is made in Finland and comes with a lifetime warranty.
As an update, I just bought the Suunto MC-2, which is quite the upgrade. It comes with a mirror for signalling and a v-notch for sighting. More importantly, it has adjustable declination and is worth the extra money.
The A-30 has found a new home in my hunting possibles pouch for those times when we want to be minimalistic – it’s a fantastic option for someone starting on a budget.
Both products have an NSN number, which means Nato Stock Number. In other words, it’s used by the military and built to strict standards. Don’t fall for all the “mil-spec” trash on the market. The real deal always has an NSN number and has earned the right to be a genuine issue.
Lastly, we carry a GPS watch, Garmin Rino 750t GPS and a charging cable to go with it.
FURTHER READING:
Never used a compass before? Learn how with our Land Navigation for Beginners guide.
Survival Signal Kit
For easy access, a Fox 40 whistle is attached to one of my backpack’s shoulder straps. This way, the whistle is always available as I go through the bush. If hunting, the gun doubles as a sound signalling device. The distance the sound can travel varies on many factors, but up to 2 miles is a real possibility.
Signal mirrors have worked as far as 160 km (100 miles). It is a pretty impressive figure for such a simple device, but not expected under normal circumstances. The signal mirror also doubles as a tool to see your face or other non-visible body parts in case you need medical attention.
Add to your signalling kit a bright orange cloth or fabric. Failing that, the foil side of the emergency blanket works just as well. Similarly, some flagging tape can come in handy to mark anything from a practical spot to an entire trail.
As an improvised visual signal, your best method is a smokey signal fire. Stay ready by keeping a big batch of green leafy branches close to you and ready to toss onto the fire. Of course, this is when First Responders via a rescue plane is underway. Or you are trying to get the attention of one.
Medical is Another Backpack Survival Gear Must!

There are endless pre-packaged first aid kits available on the market, not something we’ll go into details on other than carrying one. A better kit comes in a waterproof container, which helps protect its contents.
From time to time, check through yours for expired or damaged items and know what you have on you at all times. I tucked a few extras into mine, such as a small tube of sunscreen, lip balm and bug spray.
The latest addition for me is a CAT tourniquet in blaze orange. When you need a tourniquet, you will need it immediately and having it stand out in your survivalist backpack is not a bad idea! Our review post explains why an authentic CAT tourniquet is so vital to carry.
We have an entire post dedicated to the emergency medical kit. By emergency medical, we aren’t referring to the cute and cuddly band-aid packs. Instead, we are thinking about consequential injuries and trauma, which require items like a tourniquet. We’ll leave it at that, with a reminder: if you carry a tourniquet, be sure to carry a Sharpie! You need to mark the time of application for when you receive proper medical care.
It’s also not a bad idea to add a compact antibiotic kit to your ultimate survival pack like the one from Jase Medical.
Save $10 on Jase Medical – use code BUSHLIFE10 at checkout. See the JaseCase Antibiotic Kit here.

Soldiers swear by it: C.A.T. GEN 7 saves lives daily. Stay ahead of the game when it comes to personal safety. Don't compromise on quality, only trust a geniuine CAT Tourniquet to save your life. S&J's CAT Tourniquet comes stamped with a NATO stock number, ensuring it's trusted and recognized worldwide. Don't leave stay to chance, make sure you're prepared with the best!
FURTHER READING:
Go deeper on wilderness first aid with our Complete Emergency Medical Guide
Backpack Survival Gear Fishing Kit

Here, we have a re-purposed Altoid-style tin. This one so happens to be Barkleys, but that’s beside the point. In it, we have fishing lines, various lures, sinkers, etc. It is a super basic survival fishing kit for survival purposes, and by no means do we need a rod and reel to fish. There is also some thin metal wire to set wire snare traps. Below is a quick video on how to make a snare trap with a multi-tool.
This emergency fishing tin is my homemade creation, which you can make yourself. The idea here is to have a means to procure food from a small kit. You won’t notice it in your pack, and it’s well worth carrying!
Lighting for Your Emergency Pack
The bush on a pitch-black night without light is not a fun place to be. You know, the nights when you can’t even see your hands! That’s especially true when you are not there by choice.
The number one backpack survival gear item you want here is a headlamp, as it keeps your hands free to repair gear, prepare food or do chores around camp. I like the Petzl Swift RL. At up to 900 lumens, it provides plenty of light. It’s rechargeable via micro USB, and there are no batteries to fiddle with. I have to admit, it’s also fun showing off its automatic brightness mode with my gearhead buddies!
I also LOVE my BioLite PowerLite. It’s a small lantern. It lights up a decent area and lasts up to 75 hours on low. On high, it fills a room with light. It also doubles as a torch for when distance is an issue. Finally, at 4400 mAh, it provides a battery bank to charge other devices, such as a phone. I believe it’s discontinued, which is too bad as it’s one of my favourite pieces of gear.
Don’t Forget the Candle
Finally, I carry a UCO candle lantern. These are fantastic as they come with their container, which you can hang or set down. As the candle burns down, the mechanism inside the lantern pushes the candle up to provide you with a constant, steady light.
Remember to add a couple of extra candles to your remote bush survival gear bag. Do not use standard candles – their burn time is significantly less than the emergency variety. Candles like UCO’s burn for 9 hours – look for candles that burn for a minimum of 6 hours.
The candle is a flame extender and the last complement to the fire kit. You can start a fire with wet wood, use it as lighting or help warm up. You can place foil around the candle and increase the lighting output of the candle. When the electronics break or the batteries die, I’m going old school!
Miscellaneous Survival Gear for Remote Activities
Some other little, but very important backpack survival gear items to carry in remote areas would be maps in a zip lock to protect them from the elements. Within this same zip lock is a folded piece of tin foil – for which there are a million uses. I also carry a small piece of leather, which you can use as a work surface in the bush. A separate zip lock houses some folded toilet paper. Unless you like wiping with leaves, don’t forget the TP!
Next, we have a Rite in the Rain Notepad, pencil and tactical pen. A notepad and pencil should be in every backpack gear load out! Rite in the Rain makes various waterproof notebooks and weatherproof pens – read our Rite in the Rain review to decide which one is right for you. For taking notes, directions, leaving messages and so on. It’s a far more practical piece of wilderness survival gear than we realize.
In my pack, you will also find a high-capacity ABFOCE battery bank and Apple Lighting, micro USB and USB C charging cables for all electronic devices.
In the side pocket, we have that cotton bandana we mentioned in the water section for filtration. The bandana doubles for washing dishing, ourselves, a makeshift sling, making char cloth and whatever else we can think of.
We also carry a roll of 1″ Gorilla tape. Before I forget, there’s a cotton shemagh in the main pouch, which does everything the bandana does but is bigger and better. We can wrap our head to stay out of the sun, wrap our neck for warmth or even use it as camouflage.
In warmer months, we sneak in some bug deterrents and a tiny bottle of dish soap.
Final Thoughts: Gear is Only Half the Equation
I’ve been in the bush when things went sideways more times than I care to admit. A tree across the trail. A machine that died mid-crossing. A sky that turned from clear to dangerous in an hour. Every single time, the gear in my pack bought me time, options, and confidence when I needed all three.
None of this gear is exotic or all that expensive. The whole kit doesn’t need to cost a fortune – we even put together a budget version of this bug out bag if you’re just getting started. What matters is that it’s there, it’s organized, and you actually know how to use it before you’re standing in the rain trying to figure out a Ferro rod for the first time.
Start with the non-negotiables: a solid backpack, a full tang knife, a fire kit with at least three ignition sources, and clean water capability. Build from there. The woods will teach you the rest – just make sure you’re prepared enough to learn the lesson safely.
KEEP EXPLORING BUSHLIFE:
✔️ Essential Day Hike Packing: What to Bring and Why When Day Hiking
✔️ Homemade Trail Mix: Best Recipes for Outdoor Trips
✔️ How To Make Safe Drinking Water in the Wild
✔️ What is an MRE (Meal Ready to Eat)? Simple Ways to Pack Food
✔️ Easy DIY Survival Fishing Tin for Emergencies and Survival
👉 Keep your loved ones safe by sharing this ultimate remote survival kit guide.
Bookmark this post on Pinterest for future reference!


 20")