It’s time to cover some basic land navigation skills. Whether we are on a hike, hunt, the ATV or sled – it’s a much nicer activity when we have the confidence to know where we are, where we are going and most importantly how to come home.
Surprisingly, some people don’t even know how to read a compass! That’s a very scary thought on a subject that’s so pivotal to survival. Not to mention, it’s not that difficult to learn. Did you know that you can even navigate without a compass? So we’ll cover the modern GPS method, the traditional map and compass and a totally tool free method of gaining some form of direction. With a backup to the backup, there’s no need to ever be lost. Nor any reason to worry about it.
QUICK ANSWER
The Best Compass for Land Navigation
For most people, the Suunto A-30 ($40) is the best budget pick, and the Suunto MC-2 ($100) is the best overall – both Finnish-made, accurate to 2.5°, and owned and field-tested by us. Here’s how to choose one.
Disclosure: Posts may contain affiliate links. Purchases made through our links result in a small commission to us at no charge to you. We only recommend products that meet our brand standards based on testing and first hand use by our authors.
Land Navigation Starts With Direction: That Means a Compass
Almost everyone knows their cardinal points or directions: North, South, East and West.
Using a Compass
How to use a compass starts with the most basic technique – compass reading. Line up the compass’ north seeking arrow with north. The expression is putting it in the dog house as a good compass will have a box drawn out that the needle fits into for precision. Once the compass needle lines up with the appropriate direction of north, all your cardinal points are now pointing in the right direction – showing you exactly which way is north, south, east and west.
What is an Azimuth?
An azimuth is a direction measured in degrees clockwise from north. This measurement is taken on an azimuth circle, which has a total of 360 degrees. On this circle, 90 degrees points east, 180 degrees points south, and 270 degrees points west. Both 0 degrees and 360 degrees indicate north. Side note: a back azimuth is the opposite direction, calculated by adding or subtracting 180 degrees from your current azimuth.
For the quick science lesson on how magnetic azimuths work, the earth has a lot of molten iron flowing in its core. It essentially makes the north and south poles “geomagnetic poles” and it is this magnetic force that the needle of our compass responds to.
These very magnetic forces also create a magnetic field that reaches out into space and shields the Earth from cosmic rays or space radiation. In other words, the very forces our compass relies on also happens to keep us alive. Sorry for the side step but that’s far too interesting to omit in this post.
FURTHER READING:
A Life Skill Worth Learning! Learn more than one method of fire making using a Ferro rod.
What is the Best Compass to Buy?
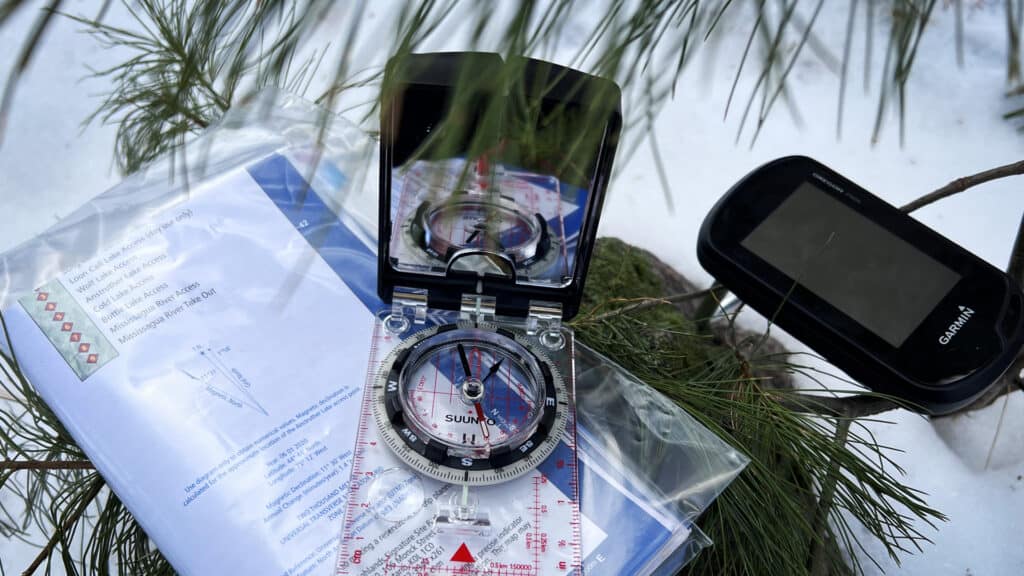
The single most important piece of gear in your land navigation kit is a compass. It is a vital instrument that should be in your pack at all times. With so many types of compasses out there – look for ones with extremely high accuracy and stability. On top of that it needs to cover all the functions you need so let’s cover these below in detail.
Compass Use: Look for Accuracy
Why you shouldn’t settle for cheap compasses?
For each degree your compass is off, you will be off course by 92 feet for every mile you travel or 17.4 metres for every kilometre. Multiply this by the number of degrees your compass is off and then multiply again by distanced travelled. You’ll quickly see how an inaccuracy problem grows almost exponentially.
In other words, accuracy is one of the first things to consider when buying a compass. I couldn’t care less what features it has or what it looks like if it can’t get me from A to B properly!
Out of all the compass brands, I prefer Suunto as they have the best compasses for land navigation. Everything is made in China these days and with certain products, yes of course they have some better quality control. The iPhone might be a perfect example. But I refuse to take that chance on my compass and so should you.
Suunto compasses are made in Finland and that’s an immediate confidence booster. It genuinely shows in the quality of their products. Since we trust our lives to a compass, it’s not exactly an item to skimp on.
A Good Compass Offers Stability!
One quick and easy way to spot a good compass is how quickly it locks onto to north. A cheap compass will swing back and forth until it eventually settles itself on north. The cheaper the compass, the longer you wait for it to line up. Once you move, even a little, the compass goes off and you then need to repeat the process all over again.
Imagine trying to find your way through the woods where repeated checking is required and you’ll quickly see why stability becomes a big issue. The Suunto compasses lock onto north almost immediately and a direction check takes a second.
Let’s look at a couple options from Suunto below, both of which I own and can speak to from experience and both have a navigation accuracy within 2.5 degrees.
Best Budget-Friendly Basic Compass: The Suunto A-30
 1")
The Suunto A-30 compass is the perfect budget-friendly companion for hiking and orienteering! With its luminescent markings, navigating in low light conditions becomes a breeze. The magnifying lens on the Suunto A-30 compass ensures you can easily read maps and details with precision, making sure you never lose your way. Crafted with a high-grade steel needle and jewel bearing, this compass offers reliable and accurate performance every time you use it. The Suunto A-30 compass comes complete with a lanyard, keeping it secure and easily accessible.
- Luminescent markings
- Magnifying lens
- High grade steel needle with jewel bearing
- Balanced bearing
- Includes lanyard
- Lightweight and durable
- Easy to use, even for beginners
- Very accurate
- Excellent quality for the price
- No sighting mirror
- No adjustable dial for declination
The Suunto A-30 is a basic compass in metric form and is balanced for the northern hemisphere. By metric, it’s in reference to the 2 scales and 1 ruler on its baseplate for working with maps. It also has a magnifying lens and a jewelled bearing for its steel needle.
 2")
It’s an excellent baseplate compass that has been with me for some years now. It locks onto north almost immediately, it’s super light and comes with a lanyard that has spent quite some time around my neck on many a hunt or woods walk.
At time of writing, the Suunto A-30 is on sale for $29.99 and is a bargain at that rate. More importantly, at a regular price of $40 it’s also about the bare minimum you need to spend in order to buy a good compass.
Best Compass for Navigation: The Suunto MC-2
 3")
The Suunto MC-2 compass is our go-to when we're hunting or off-roading! It's also a favourite with the serious outdoorsy crowd and military. With luminescent markings, this compass ensures you can navigate even in low-light conditions, keeping you on track at all times. The magnifying lens allows you to read maps with ease, while the balanced bearing ensures accurate navigation in any terrain. Equipped with an integrated clinometer, the Suunto MC-2 helps you measure slopes and angles effortlessly, adding a new dimension to your outdoor experience. The sighting hole enables you to take accurate bearings, while the declination adjustment tool ensures your readings are always spot on.
- Luminescent markings
- Magnifying lens
- Balanced bearing
- Integrated clinometer
- High-quality steel needle with jewel bearing
- Sighting hole
- Declination adjustment tool
- UTM scales and ruler
- Mirror
- Percise sighting
- Adjustable declination
- Fits into any pocket
- Measures slopes and gradient angles
- Long baseplate makes a perfect straight edge for map plotting
- Expensive if you don't use it often
- Not beginner-friendly
- Bit heavy
A recent addition for me is this land navigation machine, the Suunto MC-2 compass. It’s a real treat! No longer a basic compass, the MC-2 is an advanced navigational sighting compass with a mirror. The Suunto MC-2 is the best compass for wilderness survival!
 4")
Shooting an Azimuth
The MC-2 makes it easy for shooting azimuths at your starting point. What that basically means is rather than check the compass every so often as you walk to see if you are on course, you sight the compass into great distances and pick a prominent terrain features that’s in your intended direction of travel. Then you simply head towards that object and you’ll remain on course. Once there, you get around said object and shoot another azimuth of the same bearing to carry on with your course.
It’s a technique that’s a bit difficult to explain and we will chase this with a ‘How To Shoot a Bearing with a Compass’ video to demonstrate. Point being the MC-2 makes this task a breeze.
Suunto MC-2 Compass Features and Specs
To further the prowess of the MC-2, we are now dealing with a liquid filled capsule which makes reading the compass an absolute joy. It’s beyond stable. Included on the baseplate are units of measure – 1 metric and 1 imperial ruler along with metric scales. The MC-2 can also adjust for declination (farther below) which is a must when working with topographic maps.
 5")
Like the A-30, the MC-2 glows in the dark and comes with a neck lanyard. The price obviously goes up for the MC-2 at a $110.
To help bridge that gap a bit, the MC-2 doubles as a signal mirror which is handy for anyone lost in the woods. A sighting mirror is also a great piece of kit for any medical issues where you need to see your face or parts of your body you can’t normally see.
Finally, the magnifying lens will work to start fires. I can’t speak to how well it works as the compass is new and every single day is winter grey lately. However, I can say for certain it will ignite char cloth as I’ve seen it done before with this model.
Compass Precautions
Before elaborating on navigation techniques, there are a few compass precautions to must follow:
- Always keep your compass away from metal objects or electronic devices, which can interfere with its magnetic field.
- Check you compass regularly for damage or bubbles in the liquid-filled housing.
- Extreme temperatures can affect compass accuracy.
FURTHER READING:
Why Carry More Than Just a Lighter? Learn what the rule of three is and why a fire kit should have a permanent home in your pack.
Declination and its Effects on Land Navigation
Very Important: DO NOT Skip this Section!
 6")
Remember how we talked about “geomagnetic” poles at the very beginning of this post, the plot thickens and it affects everything you think you know about maps. The problem is there are 3 norths.
The first being true north which is based on the Earth’s axis. We’ll skip that as it’s irrelevant to this discussion. You will see true north on maps which you can ignore.
The second is grid north or what we know as “north” when we look at a map.
And for the third, there’s magnetic north which is where your compass will point. The 2 bearings of grid north and magnetic north are NOT THE SAME and that difference with which they vary is declination!
The difference between grid north and magnetic north is also known as the GM angle (Grid-Magnetic angle). It’s a very important topic because unless we adjust for declination in our compass, we won’t be following our maps properly and will find ourselves off course. Often quite severely.
Does Magnetic Declination Change Over Time?
Apologies in advance but we need to complicate matters even more. Declination varies over time and changes by location! It’s effects were discovered hundreds of years ago has been marked on maps ever since.
In a nutshell, magnetic north is moving away from Canada towards Siberia. It’s presently in the middle of the Arctic Ocean. That shift is immensely accelerating, especially in recent decades. In other words, declination is always changing and it affects on a compass also varies based on location.
Here’s a table of some cities to demonstrate some current declination values.
| City | Declination in Degrees |
| Toronto, ON | -10°8′ |
| Peterborough, ON | -10°53′ |
| Bancroft, ON | -11°20′ |
| Pembroke, ON | -11°55′ |
| Pond Inlet, NU | -29°31′ |
| London, England | +1°10′ |
*Verify current values as declination shifts over time.
What Do We Learn About Declination From This Table?
As we move north from Toronto to Pembroke, the declination slowly increases. While heading north doesn’t always have that same effect, that’s the case in this particular area. A negative declination by the way means the declination is west.
Declination at Pond Inlet which is on the upper end of Baffin Island is massive at -31.97 degrees. Remembering that formula for each degree the compass is off, here goes some math: Someone travelling just 1 km without adjusting for declination in Pond Inlet will find themselves off course by over a half kilometre! Even in Toronto, that same 1 km will put you off course by 178.2 metres.
London, England is on the list to illustrate that declination can also be small. It’s also positive in that region meaning declination towards the east.
How To Set Magnetic Declination on a Compass?
First we need to know what declination to set the compass to. Even basic topographic maps will have a declination diagram right on the map itself. If the map is really old though, those calcs will be off as the declination has changed. Also noteworthy when working with a map note the date, it’s the survey date that counts, NOT the date of printing!
NOAA has an online magnetic declination calculator based on latitude and longitude coordinates. Personally, I use magnetic-declination.com which is based on urban areas. If setting up the compass for Thunder Bay for example, you would need to look up the declination with this tool and then set the compass for a -3.77 degrees.
With the Suunto MC-2, setting declination is as simple as turning the little declination screw on the underside of the compass using the supplied mini screwdriver. In our Thunder Bay example, we need to turn the screw until the needle moves over just under 4 degrees. As to which way we are turning, a negative declination tells us that’s a west declination. The Suunto MC-2 makes this task a breeze since east and west declination markings are right on the the compass’ declination scale.
When it Comes to Land Navigation, Direction is Everything!
Yes, direction is literally everything. Let me explain. A driver in Toronto heading east on the 401 is heading towards Ottawa. Head the other way towards Windsor and you are going west. Pretty basic stuff that we all know. It’s also this basic stuff that will get you out of wooded areas when you’re lost!
When You Are Lost
In our Southern Ontario forests and remote areas, if you pick and head in any one particular direction, you will likely run into something sooner or later. That could be a road, trail, private property, lake, river and so on. In a worse case scenario when you get spun around and don’t have any idea of the lay of the land, if you stick to a default direction it’s likely something will come up along the way. We’ll elaborate on increasing those odds a little farther below.
Conversely, don’t attempt this in Northern Ontario as there may be nothing in any given direction for hundreds of kilometres! That would not be good news for someone that’s lost and will likely lead to a survival situation. Very remote areas require a lot more preparation in the form of maps and pre-planning trips with contingency plans up to and including routine check ins.
The Importance of Land Navigation BEFORE Heading Out
There’s no pulling over in the woods and asking for directions. Always secure and carry a map of the area BEFORE heading out. Then plan your route in advance and track it as you go by following pre-determined bearings and covering your distance with pace. It’s the only guaranteed way of knowing where you are going and where you are. Remember this, even a map is useless in the field if you can’t position yourself on it! In some areas there are plenty of unique landmarks to help you out but that’s not always the case.
If heading into the woods in a new area unknown to me, I like to take an extra precaution. I’ll look at where I’ll be and study the maps contour lines to learn the lay of the land. Taking note and imagining a box around the area. This way if the map gets lost (or I lose my position on it), I’m well aware of the surroundings and can choose an exit path to get back to safety. Even if the map gets lost.
In a prior section where we talk about being lost in Southern Ontario, randomly picking a direction is obviously a last case and desperate resort. In order to avoid that scenario, learn the lay of the land BEFORE heading out. You should always know that if you get lost, you have a pre-determined safety bearing that will get you back to something familiar and identifiable such as a road or river.
What if I Lose My Compass?
Well, you have a little problem on your hands. It’s so easy to get spun around in the woods. It’s happened to me and just about anyone I know. When lost, it’s a common feeling that everything looks the same and we come across objects we’ve already seen. That’s because we also have a tendency to walk in circles!
I verified the circular walking pattern with an experiment one day. I purposely chose not to look at my GPS (which was tracking me) and I put the compass away. I walked aimless until lost at which point I made the effort to find my way out un-aided. When I got out and checked my track on the GPS’ map, I did no less than 3 large circles! Why we do this I can’t explain but we walk toward our dominant side if that’s any help:)
Just STOP!
If you find you are lost, apply the STOP principle and I’ll quote this from hunter-ed.com:
- Stop: Remain calm, and analyze the situation.
- Think: Decide what you need to do to survive.
- Observe: Survey the terrain, and look for familiar landmarks.
- Plan: Figure out the next best course of action. Don’t wait until dark to plan!
There is merit to this and step one really is remain calm! Panicking and running around may only put you deeper into a direction you may not want to go. Most likely your situation isn’t dire so it’s time to start thinking about how to get out of it. And we have a few options!
Land Navigation the Ancient Way (Without Compasses)!
I always have my survival pack with me in the woods and can easily survive a night unless it’s insanely cold. Actually, that’s fine as well, it just means a long miserable night. But being prepared for a night opens some doors for you. Land navigation without a compass simply means moving at night to the stars. If you don’t know your stars or they aren’t visible that day, you’re out of luck. There is one surefire land nav technique to get some form of a bearing: the sun rises in the east and sets in the west! If you can’t see its direction as it sets, you’ll definitely see it when it rises. If you can spend the night, you’ll quickly have a bearing in the morning.
Don’t Forget Sound
Another technique is sound. The thumping of a machine in a mine, a train going by on rail line, the hum of a highway and so on are all indicators of something in a particular direction. Luckily the forest is a very quiet place which provides the luxury of hearing even faint sounds in the distance. If you looked at the map before heading out or still have your map with you, you can try falling back to the sound of a known landmark.
Land Navigation the Easy Way
Now that I bored you with magnetic poles, declination and all those other geeky goodies, you have an idea how to go about without the need for batteries or GPS signals. Electronic devices can fail when you need them the most whereas a compass will always point north. Now all you need to do is practice map reading and using a compass, as it’s a very valuable skill to have under your belt. Bush navigation is a very different topic in real life than from the comfort of your couch!
If you’re still having a difficult time learning or understanding map and compass navigation, don’t worry, there’s a land navigation course that can help. You’ll learn the anatomy of a compass, map orientation, comparing a magnetic azimuth to grid azimuth, and so on.
Once mastering the old school and at least understanding some more ancient techniques, it’s time to add to your land navigation tools. At this point, it would be wise to step into the 21st century with a portable land nav assistant, a.k.a. GPS. It can and will open so many doors!
FURTHER READING:
Don’t Count on Your Phone in the Woods! Discover what is a ham radio used for and why you should carry one with you.
The Garmin GPSMap 67i
I ATV and sled predominantly in the Nephton trails. It’s a web of different interconnecting snowmobile trails, hydro lines and other trails not marked on the map or even travelled in ages! Thanks to the Garmin, it not only tracked my route so I can find my way out, it mapped even the unmarked trails as I went through them. This allows you the pleasure of coming home and seeing on a bigger screen a map of where you were and the exact course you took. All overlayed on top of satellite imagery and known snowmobile/ATV trails. I know these trails now like the back of my hand but I wouldn’t have learned them so quickly and easily without the GPS. This is why the Garmin devices are amazing for GPS survival and route planning.
 7")
Looking for the best land navigation? The Garmin GPSMAP 67i is here! It's a handheld GPS with inReach, two-way messaging, and an SOS button if things go wrong. Maps are already loaded! See why everyone trusts Garmin.
The problem with a map and compass is unless your are on a known path (ie. trail, road and so on) or unless you can position yourself on the map with landmarks, the map becomes useless. You’re into plotting points, drawing your path on the map and pace count as you go. While that is very achievable, it’s not fun! Especially when flying by on an ATV.
Land Navigation FAQs
1. What’s the best compass for land navigation?
The Suunto MC-2 is the best compass for wilderness survival. It’s an advanced navigational sighting compass with a mirror + it makes shooting an azimuth and adjusting for declination very easy. It’s our go-to for trekking and hunting unknown lands.
2. How do you use a compass for land navigation?
Using the dog-house – line up the compass’ north seeking arrow with north. The expression is putting it in the dog house as a good compass will have a box drawn out that the needle fits into for precision. Once the compass needle lines up with the appropriate direction of north, all your cardinal points are now pointing in the right direction
Or using the Azimuth – an azimuth is a direction measured in degrees clockwise from north. This measurement is taken on an azimuth circle, which has a total of 360 degrees. On this circle, 90 degrees points east, 180 degrees points south, and 270 degrees points west. Both 0 degrees and 360 degrees indicate north. A back azimuth is the opposite direction, calculated by adding or subtracting 180 degrees from your current azimuth.
3. What is declination and how do I adjust for it?
Declination is the difference between true north and magnetic north, and it varies by location – for example, it’s about -10°8′ in Toronto. You adjust your compass by adding or subtracting your local declination before taking a bearing.
4. How do you navigate without a compass?
Use ancient wayfinding like the sun, stars, and sound. The sun rises in the east and sets in the west – at solar noon it sits at due south in the Northern Hemisphere. When using stars – find the North Star (aka Polaris) – the star is located above the two pointer stars of the Big Dipper’s bowl at 5x the distance up. You are facing true north when facing the Northern Star. If you studied your map before going out, you can fall back to the sound of a known landmark.
5. How accurate does a compass need to be?
Extremely – for each degree your compass is off, you will be off course by 92 feet for every mile you travel or 17.4 metres for every kilometre. Multiply this by the number of degrees your compass is off and then multiply again by distanced travelled. You’ll quickly see how an inaccuracy problem grows almost exponentially.
Want a printable reminder to understanding magnetic declination?
Enter your email below and grab our free Magnetic Declination guide!
👉 Have you ever been lost in the woods? What helped you find your way out? Share your story in the comments below!
More BushLife Survival Gear & Skills:
- Remote Survival Backpack: where the Suunto MC-2 compass lives
- Morakniv Garberg Review: a high-quality knife will help you survive the night
- Survival Fishing Tin: a way to procure food if you forgot to pack some
- Making Safe Drinking Water: learn how to source and purify water for survival
- Day Hiking: pack these essentials even if its a short trek into the woods
- Choosing the Right Water Bottle: carry a purposeful bottle, not a fashion accessory
- Surviving When Stranded: where a compass should also be
Bookmark this post on Pinterest for future reference!
 8")