You find yourself deep in the winter wilderness, blanketed in snow. Your survival depends on a single skill – building a fire. Can you actually make a fire in the snow?
This is BushLife, so of course you can. I’ll show you how to source dry wood, prep a burn site, and start a winter survival fire to keep you warm and alive in these harsh conditions. It’s a handy skill to add to your winter survival skills toolkit for better confidence in the woods!
Disclosure: Posts may contain affiliate links. Purchases made through our links result in a small commission to us at no charge to you. We only recommend products that meet our brand standards based on testing and first hand use by our authors.
How To Find Dry Wood for a Fire in the Snow?
How to make a fire in the wilderness always starts with fuel. No Wood = No Fire. If you have ever tried to burn wet wood, you’ll know it’s a complete and utter nightmare. Sourcing dry wood in the snow is tricky, but it’s a crucial winter survival skill.
The trick is on a summer’s rainy day – find standing deadwood. The last place to source your wood is off the ground. Any log lying on a forest floor is soaking up moisture from the ground. In today’s context, it’s also buried in deep snow and getting wet from multiple sides.
What is a Dead-Standing Tree?
A dead-standing tree is one that has died and is still standing. This type of tree dries out better.
In addition to the above, when you look at a dead-standing tree, you should know that some sections are better than others. For example, a large protruding branch creates a shoulder pocket on its underside where it meets the main trunk. This shoulder pocket will be its driest section.
You have a knife on you, correct? We’ll get to that in just a minute. If the outside layer of that dead-standing tree branch is wet, that’s fine because the inside of it is likely dry. With some essential tools, you can expose the dry inner and have your fuel for starting a fire in the snow for warmth.
FURTHER READING:
Tell Me You Drive Around with a Winter Car Emergeny Kit!?! Learn how to survive winter when stranded in your car.
Basic Cutting Tools for Fire Making
A knife is your best friend in the woods. If you could only have one tool, this is it. I carry the Morakniv Garberg Carbon, and it has a full tang. That means it’s strong enough that I can use a piece of wood to bash the knife and baton through big pieces of wood – essentially, creating an axe.
With our review of the Morakniv Garberg Carbon knife, you’ll learn some vital skills that can coincide with using an exceptional knife. Particularly feather sticking – as it helps immensely with any fire-making situation, let alone fire in the snow.

The second thing you want is a saw. A saw can process more wood and do it faster than an axe. I carry the Silky Big Boy and absolutely love it. I won’t go into the woods without it, and I have removed many downed trees that have fallen across the trail – blocking my access to get out, whether it’s on an ATV, sled or even the car on a backwoods road. It’s a light folding saw that fits in a backpack but is big enough to garburate some big trees!

Of course, there’s always the good old axe. If you love your axe and must have it, take it with you. Just remember not to bring your regular axe or maul. You want a pack axe that’s more manageable to haul if you are on foot or tight for space.
For a Bushcraft Fire, Prioritize Your Tools
At the very least, ALWAYS carry a suitable knife into the woods. If carrying an appropriate pack, have a knife and a saw at a minimum. It doesn’t matter if you are on a hike, ATV, sled, etc. Always carry essential survival gear for those SHTF scenarios, especially during the colder months when winter survival skills are crucial.
Prep Your “Fire in the Snow” Fire Place
Winter wilderness fire prep is the big one for fire in the snow! What are the steps when we when we build a fire?
- Tinder on the bottom
- Kindling on top of your dry tinder pile
- Main pieces on top of kindling
That’s not going to work to build a fire in the snow. For the record, backward fire lays are where the kindling is on top of the wood, and the fire burns down. But let’s not go there today. We will steal one idea from the reverse fire lay in a minute.
If you find a “fire pit,” Ie. Dirt with rocks around it that you or someone else built will be full of snow. Even if you can clear out a good chunk of the snow and get a fire going, the snow will melt as the heat rises. That will put out your hot coals on the bottom, essentially the heart of the fire. Even if you manage to get past that, the melting water will bubble and steam in the ashes, which becomes a constant uphill battle.
Your Fire in the Snow Solution
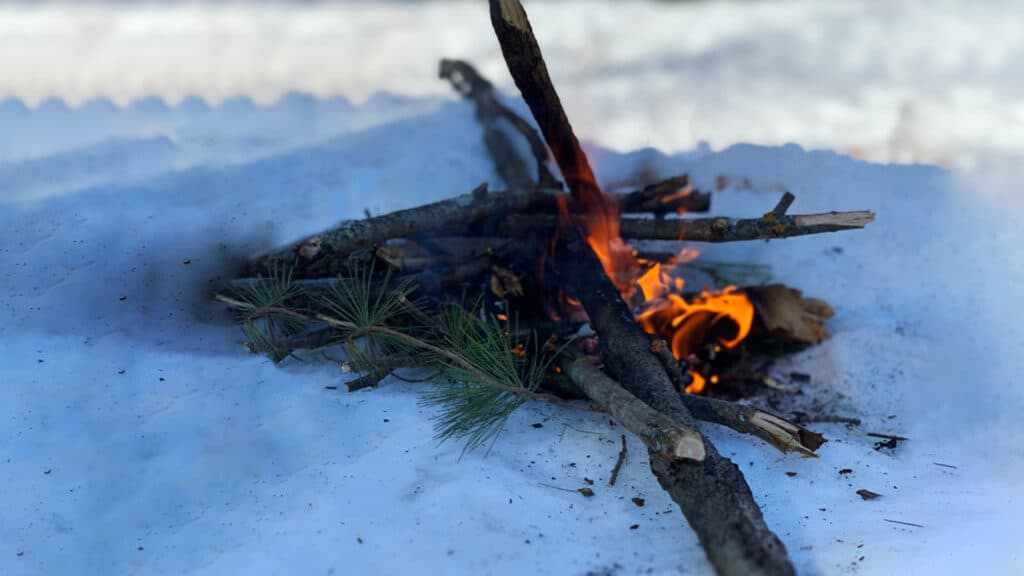
The best technique for making fire in snow-covered woods is to clear the snow from an area – any safe, flat spot will do. It doesn’t have to be perfect, so long you remove the heavy stuff.
Place a layer of rocks down as a base. Are there no available rocks? I figured as much, but that’s fine as well. Use wood! Cut thick branches or log pieces with your saw and lay them on the ground. You’ll use this as your base to get your fire out of the snow. You can then build a regular firelay on top the way you are used to, and your fire will burn.
The Plow Pile!
I’ve used the wood underlay method above on the side of my driveway. You know what I mean, the 3-4 foot high snowbank from plowing the driveway. The top photograph was its start. I still don’t know how, as it’s remarkable, but I managed to get it to burn all the way down to the ground! It took forever, but the fire burned without going out.
I suspect as the melt dribbled, it refroze in the snow below, creating a hard ice layer that the fire “sat” on. My point is that if you can make a fire on top of the snow, you can easily do it on the ground over inches of snow.
3 Sources of Ignition for Survival Fires
Here’s a recurring theme on this blog and for anyone else who knows what they are talking about. ALWAYS carry three sources of ignition in your fire kit! If you are reading about making fire in the snow, there’s a good chance you want the knowledge to conquer a survival situation. The following three items hardly take any room or weight, so make sure you carry the backup to the backup and don’t learn this the hard way.
Bic Lighter
The Bic is the gold standard for fire-making, and it’s as cheap as dirt. It’s always wise and fun to learn different methods of fire-making. But don’t kid yourself when you need to start a fire – the rule of thumb still applies. Use the fastest and easiest method you have.
The Bic gets a bad rap for two reasons. One is that it doesn’t work when it’s cold. While it’s true, I don’t have that problem, as I keep mine in an inner pocket close to my body. It’s an issue for any gas lighters, so it’s not just a Bic problem rather than a fuel problem.
The second is water. Yes, if you drop it in water and it gets water-logged, it won’t work. But if you blow on it fiercely, it’s far easier than you think to dry it out and get it working again. I’m talking 30 seconds here, and you can fix a wet Bic.
Duct Tape Pro Tip
Wrap Gorilla tape around your bic. The tape is handy for gear repair or even medical. It’s also a phenomenal tinder that burns easily and for a long time. Duct tape will save your backside one day.
Waterproof Matches
This one’s a no-brainer, sort of. Matches have changed over the years. Don’t take the cute and cuddly candle matches into the woods. We have super matches nowadays that come in waterproof containers, such as the UCO Stormproof Match Kit. These are perfect for your fire starter kit and can be a lifesaver in winter survival situations. And don’t forget to learn some match tricks to make the most of these waterproof wonders in your winter survival kit.

Ferrocerium Rod

The fire steel! Throwing sparks in the thousands of degrees, thousands of times and working in any weather conditions. It’s the ultimate backup. Not sure how to use a Ferro Rod, no worries, we’ve got you covered in How to Use a Ferro Rod. It’s a skill set that you should know and master as part of your winter survival skills.
In a nutshell, carry some vaseline-soaked cotton balls in a ziplock, which is foolproof. The spine of the Morakniv Garberg Carbon knife I keep talking about will work with the Uberleben Ferro Rod to generate those very sparks needed to light your tinder bundle. That’s, of course, if you lose the striker that comes with the Ferro Rod. Kick it up yet another notch with a rod and magnesium bar combo, such as the Fire-Fast Trekker.
Let’s Get Back to Fuel for Winter Wilderness Fire
This post assumes you have some basic fire starting skills, which we can skip. We covered what tools you need and why. We also covered elevating the fire off the ground and the surface of the snow, which is the single most important takeaway today. Let’s hone in on those wood skills a little more before we wrap up.
How to Identify a Dead-Standing Tree
It’s late fall, winter or early spring since there’s snow on the ground. That also means the leaves are down, and let’s face it, most deciduous trees look the same now. It can be challenging to spot a dead tree this time of year.
Tree Dryness Pro Tip
If in doubt, check any branch for dryness by snapping it. Dry branches don’t tear – they snap. They’ll also burn well!
If a tree is split heavily somewhere from storm damage or leaning super heavily, it’s probably dead. Ash trees are dying in droves thanks to the Emerald Ash Borer Beetle. With dead ash trees, you’ll notice the tree is missing a lot of bark. Underneath, the barkless sections will be a brighter yellowish colour. Trees missing a lot of bark are always a dead giveaway.
Woodpeckers or rot holes are typically a good sign of dead wood or dying trees. And, of course, when a tree looks sickly or rotting, it’s a good sign you found a winner.
Other Useful Trees for Fire Starting in Winter
The bark from birch trees makes for superb tinder. Birch bark will burn for a fair amount of time and is a great free resource. Scrapping birch bark (with the knife’s 90-degree spine, like the Morakniv Garberg) and then using the Ferro Rod on it works well – if you forgot the cotton balls at home!
Fatwood from pine trees is fantastic, but learning how to find it takes time. It’s the exception to dead trees on the ground. When a pine tree dies, all the oily sap inside it, which burns exceptionally, will flow to the bottom – this includes branches sticking up on a flat laying tree! That means you can find it accessible from the forest floor. Like birch bark, you can scrape fatwood using a Ferro Rod. These shavings can then be used as tinder. Even larger pieces will burn extremely well.
Punk wood – wood that is rotting turns “punky.” You’ll know a rotting piece by sight, but it’s also substantially lighter. Punk wood is another excellent fire starter, and it’s another item scooped from the forest floor. Just don’t forget, you can open wood up and grab inner pieces which are drier.
FURTHER READING:
Do You Struggle in Building a CampFire? Master the basics of fire building with our campfire post.
Make Fire in the Snow
Don’t just read about winter fire building – get out and try it! You’ll be happy you did, especially if you ever find yourself in a situation where you must make a fire in the snow for survival. Next time you are in the woods, make it a habit to learn how to identify dead-standing trees.
Lastly, take the kids on a fatwood scavenger hunt. Why pay $20 for a small piece in an outdoor store? When you discover a good section in a tree, you’ll find what would have cost you hundreds of dollars if you had to buy it in-store. If successful, throw some in your pack and understand that all the time you just spent looking for it will save you when you need it most one day.
Remember, mastering these winter survival skills and knowing how to create a winter survival fire could one day make all the difference in an emergency situation.
👉 Ready to survive the winter wilderness? Follow these fire-building tips and be prepared for any cold-weather adventure. Have any fire-building questions? Drop them in the comments below!
Bookmark this post on Pinterest for future reference!