In this post, we take a look at some traditional muzzle-loading firearms. We also cover all the accessories you need to go with it, meaning all the bits and pieces required to make a muzzleloading rifle work. As we do, we’ll cover the basics of muzzleloading so the aspiring traditional shooter will have all the information they need to buy and operate their first muzzleloader. If that isn’t enough, we’ll layer on some hunting-specific information wherever applicable.
And relax – while it’s true that muzzleloading firearms are more complicated than our modern cartridge guns, it’s nowhere near as difficult as most people think. There’s also nothing to be intimidated by, so let’s get started.
Disclosure: Posts may contain affiliate links. Purchases made through our links result in a small commission to us at no charge to you. We only recommend products that meet our brand standards based on testing and first hand use by our authors.
Note to Hunters: I Grant You An Extended Deer Hunting Season!
Actually no, I can’t do that. But a muzzleloader can! As I write this, it so happens to be right after the end of the most coveted of hunting seasons: the two-week gun season for deer. At least here in Ontario, particularly in WMU 60, one of the biggest and busiest zones.
Seems like just yesterday when everyone was in that exciting pre-season preparation mode. Then, the deer season came and went. But what if you didn’t fill your deer tag?
Like other provinces or states, there is a black powder season. Ontario’s WMU 60, for example, starts on December 5th, which is perfect as it is a gun season. When most folks have gone home, a much quieter and more peaceful hunt begins: muzzleloading. It’s catching on, but there is still an opportunity to get into it while it’s not as popular as the regular gun season. Muzzleloader hunting is particularly of value if bow shooting just isn’t for you – which is the only other way to extend the deer season.
FURTHER READING:
Organize Your Firearm Accessories! Keep your licenses, tags, and small gear secure and ready with the YETI LoadOut GoBox 1 – perfect for hunting trips or outdoor adventures. See the LoadOut GoBox →
Traditional Muzzleloaders in Canada: What You Need to Know
One of the best kept secrets of traditional muzzleloading in Canada – a flintlock original requires no permit whatsoever. A caplock antique (pre-1898 manufacture) also requires no PAL. For modern reproduction caplocks, standard PAL rules apply. Always verify with your provincial regulations as rules vary by province. In Ontario, the black powder season in WMU 60 starts December 5th – one of the best kept secrets in Ontario deer hunting!
The Traditional Muzzleloader Rifle
Rather than looking forward and chasing the latest and greatest in guns, what is often most fascinating is going the other way – travelling backwards in time!
Yes, there’s more skill required to shoot a traditional muzzleloader firearm. There’s also more gear and the need for a possibles bag.
And yes, at about two shots a minute, one also begins to appreciate every shot a tad better, making the shooter a better one over time. On top of all this, there’s a sheer beauty in that old world, handmade craftsmanship of a 150+-year-old gun. The reproduction of the modern muzzleloaders aren’t too shabby, either!
Types of Muzzleloaders
Muzzleloaders fall into 3 categories:
- Flintlocks
- Percussion Rifles a.k.a. Caplock Muzzleloader
- Inline (Modern Inline Muzzleloader)
Flintlock vs Percussion / Caplock
One of the most significant decisions when looking for a traditional muzzleloading firearm is the flintlock ignition system. We’ll leave the matchlock and wheel lock to the museum as here it has no real use.
Flintlocks are very viable guns, and reproductions are made to this day. A flintlock original (or even new reproduction) gun in Canada requires no permit. You also don’t need a PAL for a caplock, but only if it’s an antique gun, meaning it must be of pre-1898 manufacture.
Flintlock
The flintlock musket was developed in the early 16th century. That’s not old school nor vintage – we are talking 500 years old here! On a trigger pull, the “hammer,” which now holds the flint, strikes a metal frizzen. This opens the frizzen while simultaneously dropping hot sparks into the pan below. The powder in the pan burns, sending fire through the touch hole, which ignites the main charge in the bore. The gun goes boom, and the target shooter is happy, or the hunter has a harvest. It works to this day and is a viable option. The Brown Bess musket is a famous example of a flintlock military musket.
Note
The main powder charge is different than the powder in the priming pan. We’ll cover powders further below, but it’s time to address this here while comparing them to a caplock.
Caplock
All my muzzleloaders are caplock (percussion firearms), and it’s hands down my recommendation for anyone new to traditional muzzleloader shooting. It’s not that I don’t care for flintlocks – I would LOVE one, but I haven’t come across one I like. It’s also one of those guns that’s nice to have, but should probably come second after acquiring a caplock.
By caplock, we are talking about percussion cap ignition, which means no pan, no extra powder to deal with, no frizzen, and no flint!
Caplocks use a tiny little cap that goes on a nipple. On a trigger pull, the hammer hits the cap, and the gun goes boom. It superseded the flintlock for simplicity, reliability and speed of lock. The speed of lock means the speed of the ignition process, and it’s perhaps the most significant improvement over flintlocks. Flintlocks are slower than caplocks, making target shooting and hunting more challenging.
FURTHER READING:
Build Your Survival Kit! Don’t get caught unprepared. Check out our “Best 12 Gear Items for Your Outdoor Survival Kit” to make sure you have the essentials for any hunting or outdoor adventure. See the Survival Kit →
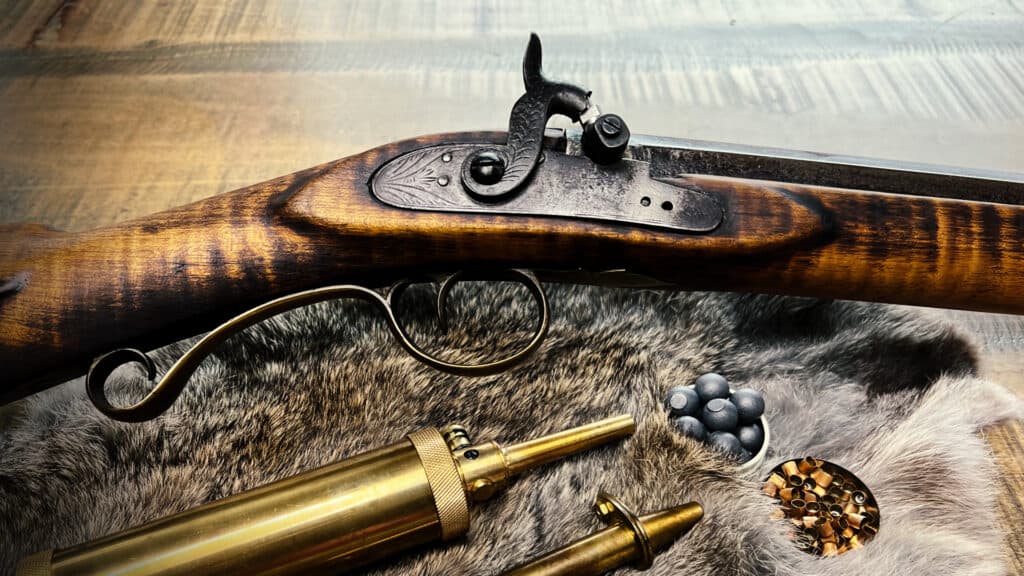
An Original Plains Rifle

Pictured is the first real gun I ever paid money for. It’s absolutely gorgeous with its tiger maple stock, heavy barrel and old-school detail. The Lyman Great Plains Rifle made sometime between 1830 and 1856, is fairly accurate to this day. It’s easily accurate enough to hunt with. That’s pretty impressive for a 170+ year old gun!
The big question when buying an original or antique rifle is its condition. Here’s what to look for:
- Is there any pitting or rust in the bore?
- Does the trigger and all lock parts work?
- Does the breech plug come out?
- Does the nipple come out?
- Do you have a gunsmith knowledgeable of traditional muzzleloaders? – NOT to be overlooked
The biggest issue with a real black powder rifle is it needs to be cleaned immediately after use. We’ll cover that later, but a neglected gun is a whole new level of neglect compared to a smokeless gun. It can cause some severe pitting. On this Plains rifle, in particular, the breech plug was free, which is rare, and so was the nipple. At some point, nipples will need replacement, and removing them before cleaning aids in the process. While a deficient bore is really bad news, a stuck breech plug or nipple can generally be repaired.
With an Original Traditional Muzzleloader, Get the Gunsmith!
This Plains rifle came with a weak spring, which didn’t have enough strength to fire the cap. The gun ended up at a gunsmith the very next day after purchase. The issue was made known by the vendor, but it’s an effort and cost consideration I was willing to make based on the excellent overall condition of this traditional muzzleloader. You will cross these bridges if you take the original rifle route.
Generally, the problem with really old guns is a lack of parts. There isn’t even a lookup for a lot of them. Back in the day, several smaller gun makers serviced the entire gun market. It’s not like today when there are 10 million plus Remington 870s floating around, and so on.
Required is a competent gunsmith for original muzzleloaders. The gunsmith needs the skills to make (or modify what parts are out there) to fit and work in your gun, which requires time, patience and money.
An original rifle is always nice to own as part of your traditional muzzleloader options – I just wouldn’t start there. My recommendation is to start with a new or slightly used reproduction model.
Danger!!
Before putting a vintage rifle into service, it should be inspected by a competent gunsmith. Do not fire a Damascus steel shotgun.
A Reproduction C Hawken

Pictured is a reproduction of the famous Hawken rifle, which is a type of American longrifle. This particular model by Investarm is from 1979. However, it can pass as a year-old gun. I suspect the longrifle was rarely used, as the bore is in mint condition. It’s easily accurate enough to shoot into a 2″ circle at 30 yards. Past that, it gets difficult to see the circle in the iron sights.
Pro Tip
Many, if not most traditional muzzleloaders are more accurate than their shooter’s capability! Focus on getting something a bit newer and mastering your skills. Then trust your gun to do its job.
This Hawken reproduction is substantially shorter, lighter, more reliable and more accurate with better sights when compared to the original Plains rifle above. It feels great and instills confidence, almost like shooting a center-fire smokeless gun, which makes for perfect candidacy as a hunting rifle!
Traditional Muzzleloader Bullets
So when we speak bullets, we picture or expect a cartridge. A bullet is the projectile that comes out of the gun.
Traditional muzzleloaders shoot patched round lead balls – imagine a mini canon. The lubed patch around the ball seals it against the bore, and the lube helps prevent fouling. The round ball suits the slow twist rate of traditional muzzleloaders. And for reference, any time we say traditional muzzleloader, we are referring to guns that are old originals OR new reproductions.
You don’t want to do the math on ballistics – it’s not good with a round ball:) But don’t discount the round ball’s hunting ability. It hits deader than dead at the correct distance.
Bullets for Hunting with a Traditional Muzzleloader
Sabots, Powerbelts and all the other newer bullets are reserved for modern inline muzzleloaders. Their faster twist rates can stabilize the bullet. Not to mention, the only bullet that should be used in a traditional rifle is pure lead. There are, however, some options for the traditional muzzleloader in the form of lead conical bullets (or maxi-balls). They don’t require patches and hit harder than round balls, making them a fantastic hunting option. That’s, of course, if your hunting emotions are in check.
What is the Most Common Caliber For A Traditional Muzzleloader?
The most common is a .50 cal muzzleloader balls. Also popular are .45 and a .54 caliber, both of which suit big games.
What Range Can You Hunt Using A Traditional Muzzleloader?
The maximum recommended range is 100 yards. Traditional muzzleloading is not viable for long-range hunting.
Note
The bullet is a bit smaller than the bore diameter of the rifle. For example:
A .54 caliber gun shoots a patched .530 cal round ball
A .50 caliber gun would shoot a .490 cal bullet
If you get into traditional muzzleloaders, you may even want to learn how to cast your bullets. Oddly, it’s not that difficult and only requires a couple of small tools!
Traditional Muzzleloader Propellent
If someone were to ask what is the best propellant for a muzzleloader? My answer is always the real deal: genuine black powder.
Black Powder Comes in Various Granulations:
| Label | Granulation | Use |
|---|---|---|
| Fg | Course | Cannons, Rifles Over .75 cal |
| FFg | Medium | .50-.75 cal |
| FFFg | Fine | Under .50 cal |
| FFFFg | Extra Fine | Priming Powder for Flintlocks |
Danger!!
Never use FFFFg or extra fine powder as the main charge. It is used for priming purposes only.
Some of the predominant black powder brands are GOEX, Swiss and Schuetzen. I’ve always used GOEX and even love their made-in-the-US since the 1802 story. You can also try an alternative like Hogdon’s Pyrodex muzzleloader powder, but I can’t speak to it as I’ve never tried it. Call me a purist, but if shooting a traditional muzzleloader, use the real stuff it is meant to shoot.
Danger!!
NEVER, NEVER, NEVER use smokeless powder in a muzzleloader. Smokeless pressures are much higher, and severe injury or death may occur.
Keep Your Powder Dry and Your Traditional Muzzleloader Clean!!!
There are a couple of downsides to black powder, well, potentially a couple, depending on how you look at it. One is smoke, and believe me, there is lots of it! I love it – it’s part of the fun of shooting a traditional muzzleloader.
By downside, the smoke makes for some difficulty in the follow through as it’s often hard to immediately see your target after shooting. It’s not a big deal, but it takes a little getting used to.
The second and massive downside is that black powder is hygroscopic. Ie. It absorbs water! That old saying “keep your powder dry” means exactly that as it won’t work wet. It causes a secondary problem which comes after shooting: corrosion. The fouling inside your gun will rust out very quickly. As soon as you’re finished with black powder shooting, make sure you ALWAYS clean your gun.
Accessories for Traditional Muzzleloaders

Yes, there’s a lot of them. Now that we sorted out the gun, bullets and powder, it’s time to look at all the other pieces to make it all work. Don’t skip this section – you NEED these things.
Horn / Dispenser
Black powder usually comes in plastic jugs and has a wide opening, which can be hard to pour out of. Nor do you want to carry around a 1 LB plastic jug… There are a million various purpose-built powder horns or brass flasks to store your powder for the range or your hunt. I use a brass powder flask with a push-button valve. It has a fine spout on the end, which makes it easy to get the powder into the powder measure.
Danger!!
DO NOT pour black powder from the jug or dispenser into your rifle, especially on a reload. If there are any embers or sparks, the container will become a bomb. Always load your rifle from a powder measure.

SZCO's steer horn beats plastic fakes every time! Keep your powder dry with this sweet 14 inch powder horn, crafted from real animal horn. Complete with a sturdy leather strap for easy carry and a solid wood plug to keep moisture out. Grab your Szco Powder Horn today!
Powder Measure
Next, you’ll need a method to measure the black powder amount for your load. Black powder is measured in grains – but by volume, not weight. I use a 0 – 120 grain adjustable brass powder measure. For example, the .50 cal Hawken rifle above holds a typical powder charge of around 70 grains with a patched round ball.
You will need to fiddle with different loads to see what your gun prefers for the best balance in power and accuracy. The beauty of traditional muzzleloaders is you can fiddle with your charge, and each shot is basically like your own hand load. It’s not too finicky when you are adding more or less powder. However, do READ YOUR MANUAL for maximum safe loads!
Pro Tip
You’ll also notice brass as a recurring theme with accessories – but most people don’t know why!!! Brass will NOT SPARK, which is vital considering that anytime you pour an explosive load into your gun, it’s potentially rubbing against a hard steel muzzle.
Ball Starter, Ramrod, Jag and Bullet Puller
After measuring and pouring your powder down the muzzle, in comes the ball. I usually put a lubed patch right over the muzzle and get the ball into the middle by hand. Next comes the ball starter’s short end to get it just past the muzzle, and then its long end to get it down a little farther.
To fully seat the bullet, you use a muzzleloader ramrod. Every gun has a built-in one, but I like to have a separate brass ramrod for loading when target shooting. The brass one is also for cleaning with brushes and a jag.
As to the “bullet puller,” it is exactly what it says. A bullet-pulling ramrod attachment. Just in case anything goes wrong, such as forgetting to put the powder in before the bullet. Before you laugh and write someone off as a moron, “dry balling” happens to all of us at some point. So keep a bullet puller handy!
Danger!!
When loading, the ball ALWAYS needs to sit right on top of the powder. If not, you’ve created a very deadly pipe bomb. Once again, I’ll say relax here. While all this may seem scary, traditional muzzleloaders are very safe. Seat the ball, and you’ll be fine and ask for help if in doubt. It’s also good practice to mark your ramrod on a typical load, leaving you with a future reference point.
Caps / Flint and Tools
Most rifles use a #11 percussion cap. They generally come in 100-quantity packs and aren’t overly expensive. A challenge is stock, so if you see them, buy them! Suggested is that you always have a spare nipple or two for your gun, and a must is a nipple wrench.
Flintlocks are more complicated. You’ll need spare flint(s), a fancy leather holder for your spares, sharpening tools, FFFFg priming powder and a separate powder dispenser. The powder dispenser is a lot smaller than that of the main charge.
You will also need fine picks to clean the nipple passage or touch hole. For this, you can buy various-sized welding tip cleaning sets for a few bucks.
Patches, Lots of Patches!!!
The patches I use are round and good for .45, .50 and .54 calibre. That makes it easy if you have multiple guns. The more you buy in bulk, the cheaper it is, and you’ll find substantial savings. Traditional muzzleloaders get dirty from black powder shooting! If you don’t go through the patches in shooting, you will be on cleaning.
Authentic shooters will carry around patch material called pillow ticking, and they cut it themselves with a patch knife. It’s a cool concept but difficult to come across. However, available are some pre-cut (often lubed) pillow-ticking patches. It gives you a nice patch without the hassle of cutting your own.
FURTHER READING:
Protect Your Rifle! Learn time tested rifle cleaning techniques to preserve your gun.
Bore Butter – The Traditional Muzzleloader’s Best Friend
Some folks like to moisten the patches in their mouth before shooting. Instead, I use bore butter:) Bore butter is all-natural and helps prevent fouling in the barrel. I always run a clean, dry patch in between shots. It’s not technically necessary, and you’ll know when you have too much fouling as the ball gets harder to seat with the ramrod.
Over time, you’ll know how many shots you can get in before needing a dry patch. Bore butter allows you to get in more shots without removing the fouling.
After cleaning, I always used a bore butter-saturated patch to coat the barrel for storage. It helps prevent rust. Some people prefer Ballistol for storage, and that’s fine as well.
Pro Tip
Whatever you do, DO NOT use petroleum-based oils inside your traditional muzzleloader! Those oils with black powder will turn into tar, which will be difficult to remove.
Breech Plug and Nipple Grease for Muzzleloading Firearms
When cleaning your muzzleloading firearm, whether it’s a caplock rifle or a flintlock musket, always remove the breech plug and the nipple. This practice ensures these components doesn’t rust over time and get stuck, while also facilitating easier cleaning of the rifle. There is, however, a very specific grease for it. You can buy a small tube of grease that will probably last you a very long time. Make sure to use it on the breech plug and nipple threads of your black powder rifle.

FURTHER READING:
Want to go deeper? Capandball on YouTube – a Hungarian military history professor with world-class knowledge on antique firearms and traditional muzzleloading. Worth every minute.
How Do You Load a Traditional Muzzleloader?
We have hinted at the process along the way. Let’s summarize the how to loading procedures for shooting a traditional muzzleloader, be it one of the various types of muzzleloaders like American long rifles or modern inline muzzleloaders:
- Make sure there is no ignition source: percussion cap or priming powder (if flintlock) on the gun removed. That doesn’t mean it’s not loaded, as there may be a charge in the bore – it just has no ignition.
- Carefully check the bore to ensure there is no charge. It’s a lot harder to do with these guns. With mine, I KNOW, unequivocally, they aren’t loaded as I store them that way. I always ensure it’s discharged and cleaned BEFORE going into storage. Suggested is marking the ramrod with an unloaded line for future ease of checking.
- Run dry cleaning patches down the overall length of the bore until clean. It removes any storage oil or debris.
- Point the gun in a safe direction and pop a few percussion caps. Doing so will dry out any remaining oil or moisture. With the last percussion cap, use grass, dirt or leaves at the muzzle and watch them move to ensure a clear pathway.
- Optional: Run one final dry muzzleloader patch to pick up any oil or moisture pushed out by the caps.
- Measure your black powder with the powder measure. With the gun pointing up but away from your face, pour the measured powder charge down the muzzle. With your free hand, tap the gun a few times to seat the powder.
- Lube a patch and place it over the muzzle. Center the round lead ball by hand and use the short starter to get it down about 4″.
- FULLY seat the bullet with the muzzleloader ramrod. A steady motion is best, and avoid whacking the bullet, which may cause deformation. When the bullet is seated, dropping the ramrod from a nominal height above the bullet will cause the ramrod to bounce, helping to indicate a seat. Also, confirm by reading the seated line on your ramrod (once marked).
- Always keep any gun pointed in a safe direction, whether loaded or not. With a charge in a traditional muzzleloader – the deadliest part of the gun is technically loaded! Treat it as such going forward.
- Pull the trigger back to half cock and insert the percussion cap. You are now “loaded,” at least in the eyes of the law. For flintlocks, this means lifting the frizzen, putting some priming powder in the pan and closing the frizzen back up.
Now, you are ready for black powder shooting, whether it’s for muzzleloader hunting or target shooting. Remember to shoot in a safe direction, down range, with a safe backstop.
Note
If there is a double-set trigger and 1 barrel, it is a set trigger system. You can pull the first trigger to discharge the gun or the rear trigger first, which makes the front trigger a LOT more sensitive! Refer to the manual to confirm and follow those instructions versus mine.
How Do You Unload a Traditional Muzzleloader?
Shoot it! It’s the safest way to unload your muzzleloading firearm.
It is ok to remove the cap or priming powder when you need to relocate hunting positions, climb a tree stand, etc. In the eyes of the law, it is “unloaded” when there is no cap or primer, AND one is relocating hunting spots.
I don’t recall if the flint may need to be removed or not, but check YOUR local laws and regulations on loaded versus un-loaded status when it comes to muzzleloading gun laws. In the eyes of reality, you CANNOT be cautious enough anytime there is a main charge in the bore. Treat the gun as loaded even if the ignition source is removed.
How To Clean a Traditional Muzzleloader?
Cleaning a muzzleloader can be a post of its own, but we’ll give it the quick and dirty. As always, make sure it’s not loaded. It’s now time to break the gun down.
Separating the barrel from the stock is usually done by punching out the wedge that holds it in place. Sometimes there’s also a screw. Once the barrel is separated, remove the breech plug and nipple from the barrel. Note that certain modern reproduction guns have a removable breech plug. It is not necessarily meant to be removed other than servicing done by a gunsmith.
Fill a jug or bucket with hot soapy water (the hotter, the better). The heat aids in cleaning but also helps dry the barrel when done. I took a windshield washer fluid jug and cut off the top. I couldn’t tell you why, but it works great as a designated wash bin:) Some people add a dab of soap to the water, others don’t.
Soak the breech plug and nipple in the bucket while you work on the barrel. The barrel goes in the bucket breach side down. With a cleaning patch over a jag, go up and down from the muzzle several times as it acts as a pump and washes the bore. Your water will turn black!
Finishing the Barrel
Depending on how big of a cleaning I need, I may also run a bronze brush. If so, I’ll follow that with another patched jag to rinse. If the water is black, I like to drain it and “pump” it again with another patched jag and clean water. Then remove the barrel, run a dry patch down the barrel length and leave the barrel out to fully dry. Once dry, run a Bore Butter or Ballistol saturated patch for storage.
Don’t forget to clean the breech plug and nipple. Pipe cleaners are amazing for cleaning nipples.
Re-Assembly of the Percussion Muzzleloader
- With everything dry, apply the grease to the breech plug and nipple threads.
- Re-install into the barrel.
- Re-attach the barrel to the gun with the wedge.
- Wipe down all exterior metal with gun oil to clean and protect. I love and recommend Ballistol for this.
- Use the Thompson Center bore butter to clean and condition all the wooden furniture. It helps prevent it from drying out.
My Recommendation on Where to Start
If you’re new to traditional muzzleloading – start with caplock reproduction. Not a flintlock, not an original antique, not an inline. A good quality caplock reproduction gives you the authentic experience without the complications of a flintlock or the gunsmith bills of an antique.
The Hawken style reproductions are a great starting point – accurate, reliable, and they look the part. Once you have your rifle, build your possibles bag with the essentials: powder horn, powder measure, patches, caps, ball starter, ramrod, and bore butter. Don’t forget the breech plug grease – your future self will thank you.
And remember – in Ontario, the black powder season starts December 5th in WMU 60. That’s a gift of extra hunting days most hunters are leaving on the table. Don’t be one of them.
More From BushLife on Guns & Traditional Shooting:
- Muzzleloader Possibles Bag Guide: carry your black powder essentials the right way
- Custom Remington 870 Review: for when you want the modern side of shooting
- Henry AR-7 Survival Rifle: the lightweight .22 every hunter should know about
- Rifle Cleaning Guide: keep your muzzleloader in perfect condition
👉 Don’t forget to share on social and subscribe to our newsletter if you don’t want to miss our posts.
Bookmark this post on Pinterest for future reference!